Push Notifications
Register for push notifications, track taps, and handle deeplinks with the Zeta SDK.
This guide is for iOS developers integrating Zeta push notifications into a consumer app. It covers the end-to-end setup required to receive push notifications, report engagement back to ZMP, and handle deeplinks — from requesting notification permission to verifying a working integration.
This page also covers the Notification Service Extension for delivery tracking and rich notifications.
On this page
- Push lifecycle
- Prerequisites
- Register the device token
- Re-register the token after app updates
- Track notification taps
- Handle deeplinks
- Notification Service Extension
- Rich notification support
- Test your integration
- How push tracking works
- FAQ
Push lifecycle
The following diagram shows how a push notification flows from campaign creation to engagement tracking.
flowchart LR
    ZMP["ZMP Campaign"] --> APNs
    APNs --> Device
    Device --> NSE["Notification Service Extension"]
    NSE -->|"delivered event"| ZMPBackend["ZMP Backend"]
    NSE -->|"rich media"| Banner["Notification Banner"]
    Banner -->|"user tap"| AppDelegate
    AppDelegate -->|"message_clicked event"| ZMPBackend
Prerequisites
Complete these steps before integrating Zeta push notifications.
Upload APNs credentials to ZMP
Before the SDK can deliver push notifications, ZMP must hold a valid APNs credential for your app. In the Apple Developer portal:
-
Go to Certificates, Identifiers & Profiles → Keys and create a new key with Apple Push Notifications service (APNs) enabled. Download the
.p8file and note the Key ID and Team ID.Tip: An APNs Auth Key (
.p8) is preferred over a.p12certificate — it never expires and works for both sandbox and production. -
Upload the key (or a
.p12certificate if you are using the legacy scheme) to ZMP. See Mobile app registration — Upload push notification certificates for the step-by-step ZMP portal walkthrough.
Initialize the SDK
Follow Getting Started to initialize ZetaClient in application(_:didFinishLaunchingWithOptions:).
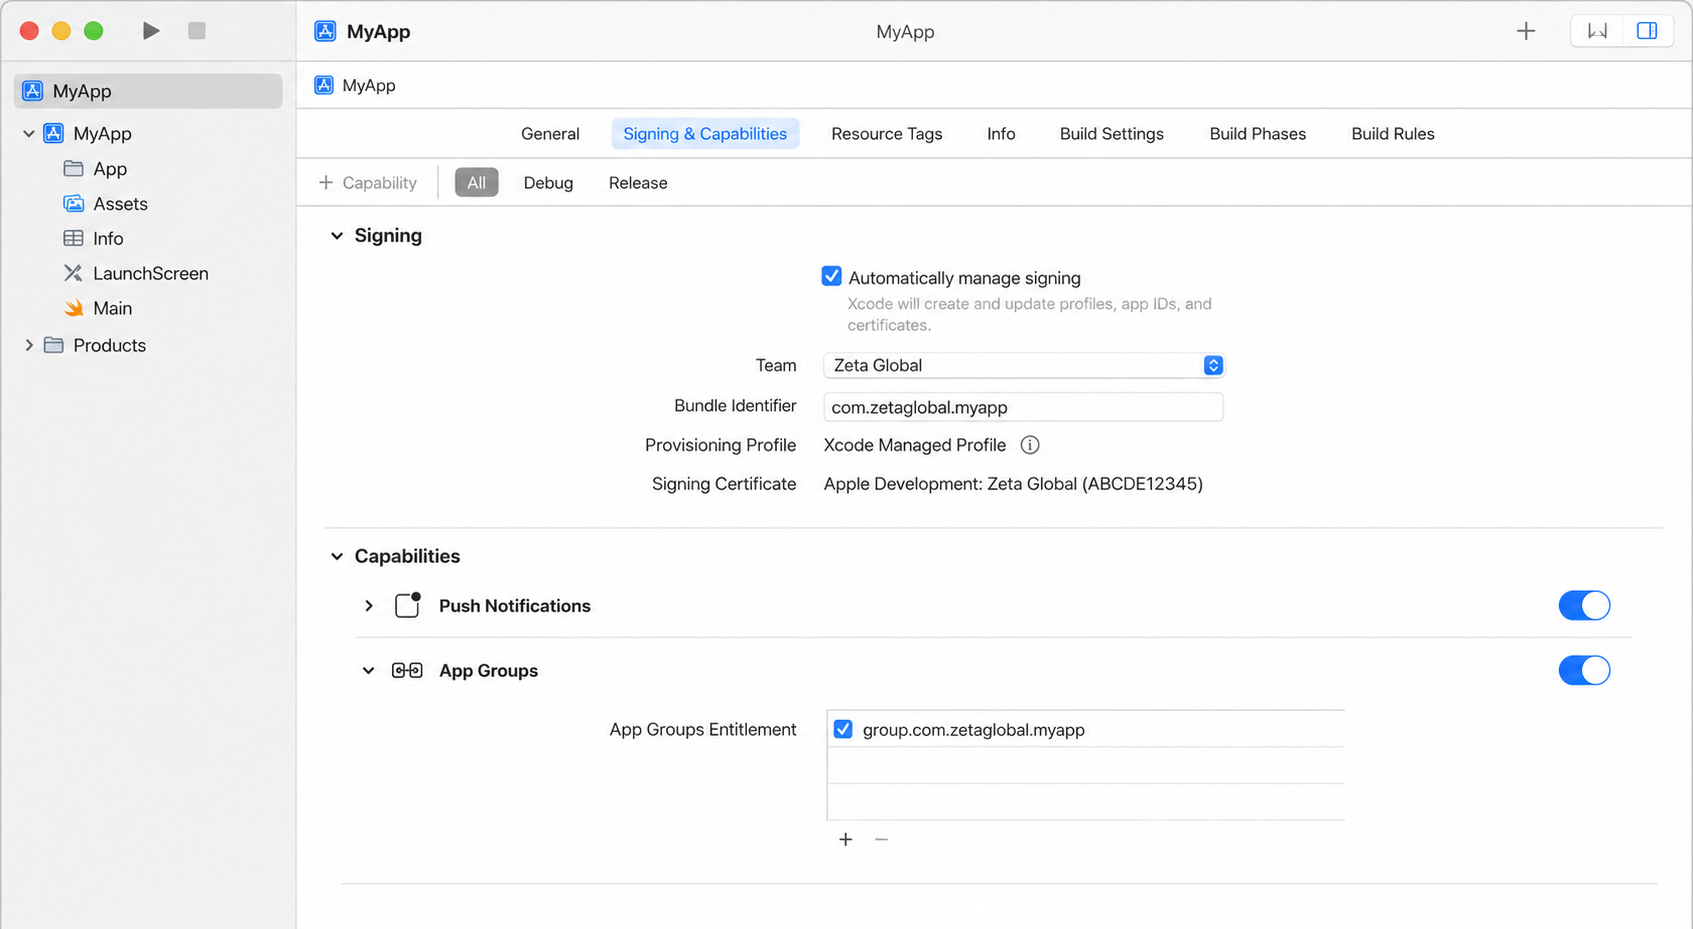
Enable the Push Notifications capability
In Xcode, go to your app target's Signing & Capabilities and add the Push Notifications capability.
Request notification permission
Request authorization from the user so your app can display alerts, play sounds, and badge the app icon.
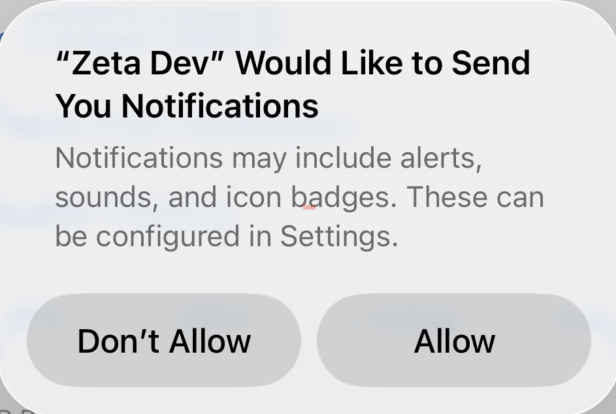
push permission dialog box iOS
Best practice: show a rationale screen first. The OS permission dialog is a one-shot — if the user taps "Don't Allow", your app cannot show it again. Present your own screen explaining the value of notifications (e.g., order updates, personalized offers) before calling
requestAuthorization. This is the single most effective way to improve opt-in rates.
// Your custom pre-permission screen dismisses, then calls this:
func requestNotificationPermission() {
    UNUserNotificationCenter.current()
        .requestAuthorization(options: [.alert, .sound, .badge]) { granted, error in
            guard granted, error == nil else { return }
            DispatchQueue.main.async {
                UIApplication.shared.registerForRemoteNotifications()
            }
        }
}let center = UNUserNotificationCenter.current()
center.requestAuthorization(options: [.alert, .sound, .badge]) { granted, error in
if let error = error {
print("Push authorization error: \(error)")
}
}UNUserNotificationCenter *center = [UNUserNotificationCenter currentNotificationCenter];
[center requestAuthorizationWithOptions:(UNAuthorizationOptionAlert | UNAuthorizationOptionSound | UNAuthorizationOptionBadge)
completionHandler:^(BOOL granted, NSError *_Nullable error) {
if (error) {
NSLog(@"Push authorization error: %@", error);
}
}];After the user grants permission, register for remote notifications:
UIApplication.shared.registerForRemoteNotifications()[[UIApplication sharedApplication] registerForRemoteNotifications];Set your notification delegate
Assign UNUserNotificationCenter.current().delegate in application(_:didFinishLaunchingWithOptions:).
func application(_ application: UIApplication,
                 didFinishLaunchingWithOptions launchOptions: [UIApplication.LaunchOptionsKey: Any]?) -> Bool {
    UNUserNotificationCenter.current().delegate = self
    // ... SDK initialization, permission request, etc.
    return true
}- (BOOL)application:(UIApplication *)application
didFinishLaunchingWithOptions:(NSDictionary *)launchOptions {
[UNUserNotificationCenter currentNotificationCenter].delegate = self;
// ... SDK initialization, permission request, etc.
return YES;
}Warning: Assign the delegate synchronously before the app finishes launching. If you set it later, your app may miss notifications that arrive while it is starting up. See Apple's
UNUserNotificationCenterDelegatedocumentation.
Set up the Notification Service Extension
Add a Notification Service Extension target to enable delivery tracking and rich media (images, GIFs, videos). See Notification Service Extension below.
Register the device token
Forward the APNs device token to the SDK from your app delegate.
func application(_ application: UIApplication, didRegisterForRemoteNotificationsWithDeviceToken deviceToken: Data) {
    ZetaClient.shared.user?.updateDeviceToken(token: deviceToken)
}- (void)application:(UIApplication *)application
didRegisterForRemoteNotificationsWithDeviceToken:(NSData *)deviceToken {
[[ZetaClient shared].user updateDeviceTokenWithToken:deviceToken];
}Re-register the token after app updates
When integrating the SDK into an existing iOS application, pass the device push token to the SDK explicitly using updateDeviceToken(token:).
ZetaClient.shared.user?.updateDeviceToken(token: deviceToken)[[ZetaClient shared].user updateDeviceTokenWithToken:deviceToken];During app updates, application(_:didRegisterForRemoteNotificationsWithDeviceToken:) is not guaranteed to fire automatically. The previously cached token may not be relayed to the SDK after the update.
To ensure the SDK receives the latest token, explicitly re-register for remote notifications at launch:
if UIApplication.shared.isRegisteredForRemoteNotifications {
    UIApplication.shared.registerForRemoteNotifications()
}if ([UIApplication sharedApplication].isRegisteredForRemoteNotifications) {
[[UIApplication sharedApplication] registerForRemoteNotifications];
}To maintain reliable push delivery, always provide a valid device push token to the SDK — either during launch or when you obtain a new token.
Track notification taps
Track user taps on a Zeta notification from UNUserNotificationCenterDelegate's didReceive method. You can track taps in one of two ways:
Option 1 — Delegate the decision to the SDK
Call ZetaClient.shared.push?.userNotificationCenter(_:didReceive:withCompletionHandler:) from your delegate. If the SDK handles the notification, it returns true; do not call the completion handler yourself in that case — the SDK invokes it.
extension AppDelegate: UNUserNotificationCenterDelegate {
    func userNotificationCenter(_ center: UNUserNotificationCenter,
                                didReceive response: UNNotificationResponse,
                                withCompletionHandler completionHandler: @escaping () -> Void) {
        if ZetaClient.shared.push?.userNotificationCenter(center, didReceive: response, withCompletionHandler: completionHandler) == true {
            return
        }
        completionHandler()
    }
}- (void)userNotificationCenter:(UNUserNotificationCenter *)center
didReceiveNotificationResponse:(UNNotificationResponse *)response
withCompletionHandler:(void (^)(void))completionHandler {
BOOL handled = [[ZetaClient shared].push
userNotificationCenter:center
didReceive:response
withCompletionHandler:completionHandler];
if (handled) {
return;
}
completionHandler();
}Option 2 — Track clicks manually
Call trackNotificationClicked(response:) directly and manage the completion handler yourself.
extension AppDelegate: UNUserNotificationCenterDelegate {
    func userNotificationCenter(_ center: UNUserNotificationCenter,
                                didReceive response: UNNotificationResponse,
                                withCompletionHandler completionHandler: @escaping () -> Void) {
        ZetaClient.shared.push?.trackNotificationClicked(response: response)
        completionHandler()
    }
}- (void)userNotificationCenter:(UNUserNotificationCenter *)center
didReceiveNotificationResponse:(UNNotificationResponse *)response
withCompletionHandler:(void (^)(void))completionHandler {
[[ZetaClient shared].push trackNotificationClickedWithResponse:response];
completionHandler();
}Handle deeplinks
A deeplink is a URL string configured in the ZMP campaign that tells your app where to navigate when the user taps the notification. The SDK extracts the deeplink from the push payload and delivers it to your app through ZTDeeplinkDelegate — your app owns all routing.
Set the delegate after initializing the SDK, and keep using Option 1 above so the SDK processes the tap.
ZetaClient.shared.push?.setDeeplinkDelegate(deeplinkDelegate: self)[[ZetaClient shared].push setDeeplinkDelegateWithDeeplinkDelegate:self];Implement ZTDeeplinkDelegate:
public protocol ZTDeeplinkDelegate: AnyObject {
    func receivedDeeplink(deeplink: String, extraInfo: [String: String]?)
}@protocol ZTDeeplinkDelegate <NSObject>
- (void)receivedDeeplinkWithDeeplink:(NSString *)deeplink
extraInfo:(nullable NSDictionary<NSString *, NSString *> *)extraInfo;
@enddeeplink— the deeplink value from the ZMP campaign payload. This is whatever string was entered in the ZMP campaign builder — it could be a custom scheme URL (myapp://products/123), a universal link (https://myapp.com/products/123), or any arbitrary string. Your app decides how to interpret it.extraInfo— theextraInfodictionary from the ZMP campaign payload.
Routing example
A minimal implementation that parses the deeplink string and navigates:
class DeeplinkRouter: ZTDeeplinkDelegate {
    func receivedDeeplink(deeplink: String, extraInfo: [String: String]?) {
        guard let url = URL(string: deeplink) else { return }

        switch url.host {
        case "products":
            let productId = url.lastPathComponent
            navigateToProduct(productId)
        case "settings":
            navigateToSettings()
        default:
            UIApplication.shared.open(url)
        }
    }
}
For iOS deeplink and universal link setup, see Apple's guides:
Notification Service Extension
Use the ZetaNotificationService module inside a Notification Service Extension (NSE) to track push delivery and render rich media (images, GIFs, videos).
Important: Without the Notification Service Extension, the SDK cannot generate delivery receipts. Push notifications may still reach the device, but delivery events will not appear in ZMP reporting.
Setting up ZTNotificationService
ZTNotificationService-
Add a Notification Service Extension target to your app.
1.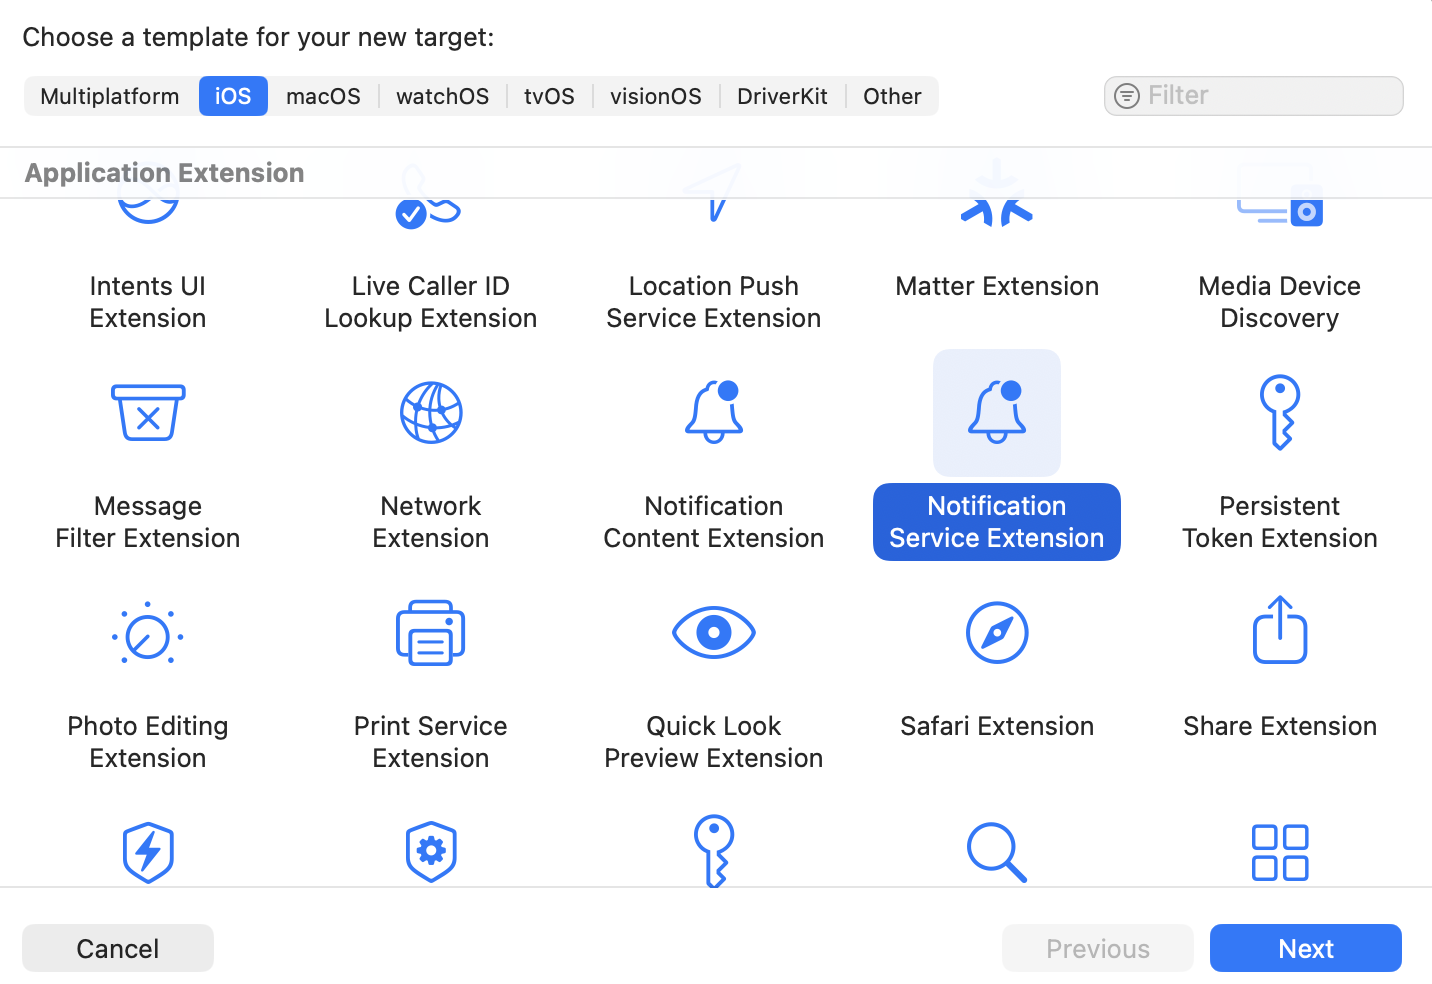
choose target as notification service extension
-
Add the
ZetaNotificationServicemodule to that extension target and app target). -
Call
ZTNotificationService.canHandle(_:)to check whether the incoming notification is a Zeta notification. -
Call
ZTNotificationService.trackNotificationDelivered(_:appGroupId:)with your App Group ID to record delivery.
You can use ZTNotificationService in two patterns.
Pattern 1 -- Subclass ZTNotificationService
ZTNotificationServiceMake your NotificationService class inherit from ZTNotificationService. Delivery tracking is explicit; rich rendering is handled by super.didReceive(_:withContentHandler:).
import ZetaNotificationService
import UserNotifications

class NotificationService: ZTNotificationService {

    public override func didReceive(_ request: UNNotificationRequest,
                                    withContentHandler contentHandler: @escaping (UNNotificationContent) -> Void) {
        if ZTNotificationService.canHandle(request) {
            ZTNotificationService.trackNotificationDelivered(request, appGroupId: "group.com.xyzapp")
            super.didReceive(request, withContentHandler: contentHandler)
            return
        }

        contentHandler(request.content)
    }
}
@import ZetaNotificationService;
@import UserNotifications;
@interface NotificationService : ZTNotificationService
@end
@implementation NotificationService
- (void)didReceiveNotificationRequest:(UNNotificationRequest *)request
withContentHandler:(void (^)(UNNotificationContent *))contentHandler {
if ([ZTNotificationService canHandle:request]) {
[ZTNotificationService trackNotificationDelivered:request
appGroupId:@"group.com.xyzapp"];
[super didReceiveNotificationRequest:request withContentHandler:contentHandler];
return;
}
contentHandler(request.content);
}
@endPattern 2 -- Use ZTNotificationService directly
ZTNotificationService directlyKeep your existing UNNotificationServiceExtension subclass and call the static helpers.
import ZetaNotificationService
import UserNotifications

class NotificationService: UNNotificationServiceExtension {

    public override func didReceive(_ request: UNNotificationRequest,
                                    withContentHandler contentHandler: @escaping (UNNotificationContent) -> Void) {

        if ZTNotificationService.canHandle(request) {
            ZTNotificationService.trackNotificationDelivered(request, appGroupId: "group.com.abc.xyzproduct")
            ZTNotificationService.handleNotification(request, withContentHandler: contentHandler)
            return
        }

        contentHandler(request.content)
    }
}
@import ZetaNotificationService;
@import UserNotifications;
@interface NotificationService : UNNotificationServiceExtension
@end
@implementation NotificationService
- (void)didReceiveNotificationRequest:(UNNotificationRequest *)request
withContentHandler:(void (^)(UNNotificationContent *))contentHandler {
if ([ZTNotificationService canHandle:request]) {
[ZTNotificationService trackNotificationDelivered:request
appGroupId:@"group.com.abc.xyzproduct"];
[ZTNotificationService handleNotification:request
withContentHandler:contentHandler];
return;
}
contentHandler(request.content);
}
@endNote: The App Group ID you pass to
trackNotificationDelivered(_:appGroupId:)must match the one configured inZTConfig.appGroupIdin the app target.
Rich notification support
Rich notifications allow marketers to send media-enabled pushes without developer involvement. A ZMP user uploads a single media file or a URL; the SDK downloads the media and displays it inside a standard push notification.
Supported media:
| Type | Formats |
|---|---|
| Image | JPG, GIF, PNG |
| Video | MP4 |
Media guidelines
- Use a 2:1 aspect ratio (landscape) for expanded push notifications.
- Images span the full width of the notification; height adjusts proportionally.
- Keep media files under 2 MB — this is the limit enforced by Zeta. Larger files may not download within the Notification Service Extension's time budget and the notification will be displayed without the attachment.
- Media must be hosted on an external server and linked via an
https://URL in the notification payload. APNS rejects notifications where the total payload exceeds 4 KB, so keep Additional Values and other payload fields concise.
Test your integration
After completing the steps above, verify that push notifications work end-to-end:
- Build and run the app on a real device — push notifications do not work reliably on the simulator.
- Confirm the device token is forwarded to the SDK. Add a print statement in
application(_:didRegisterForRemoteNotificationsWithDeviceToken:)to verify. - Send a test push from ZMP.
- Verify the notification appears on the device when the app is in the background.
- Tap the notification and confirm the
message_clickedevent appears in ZMP reporting.
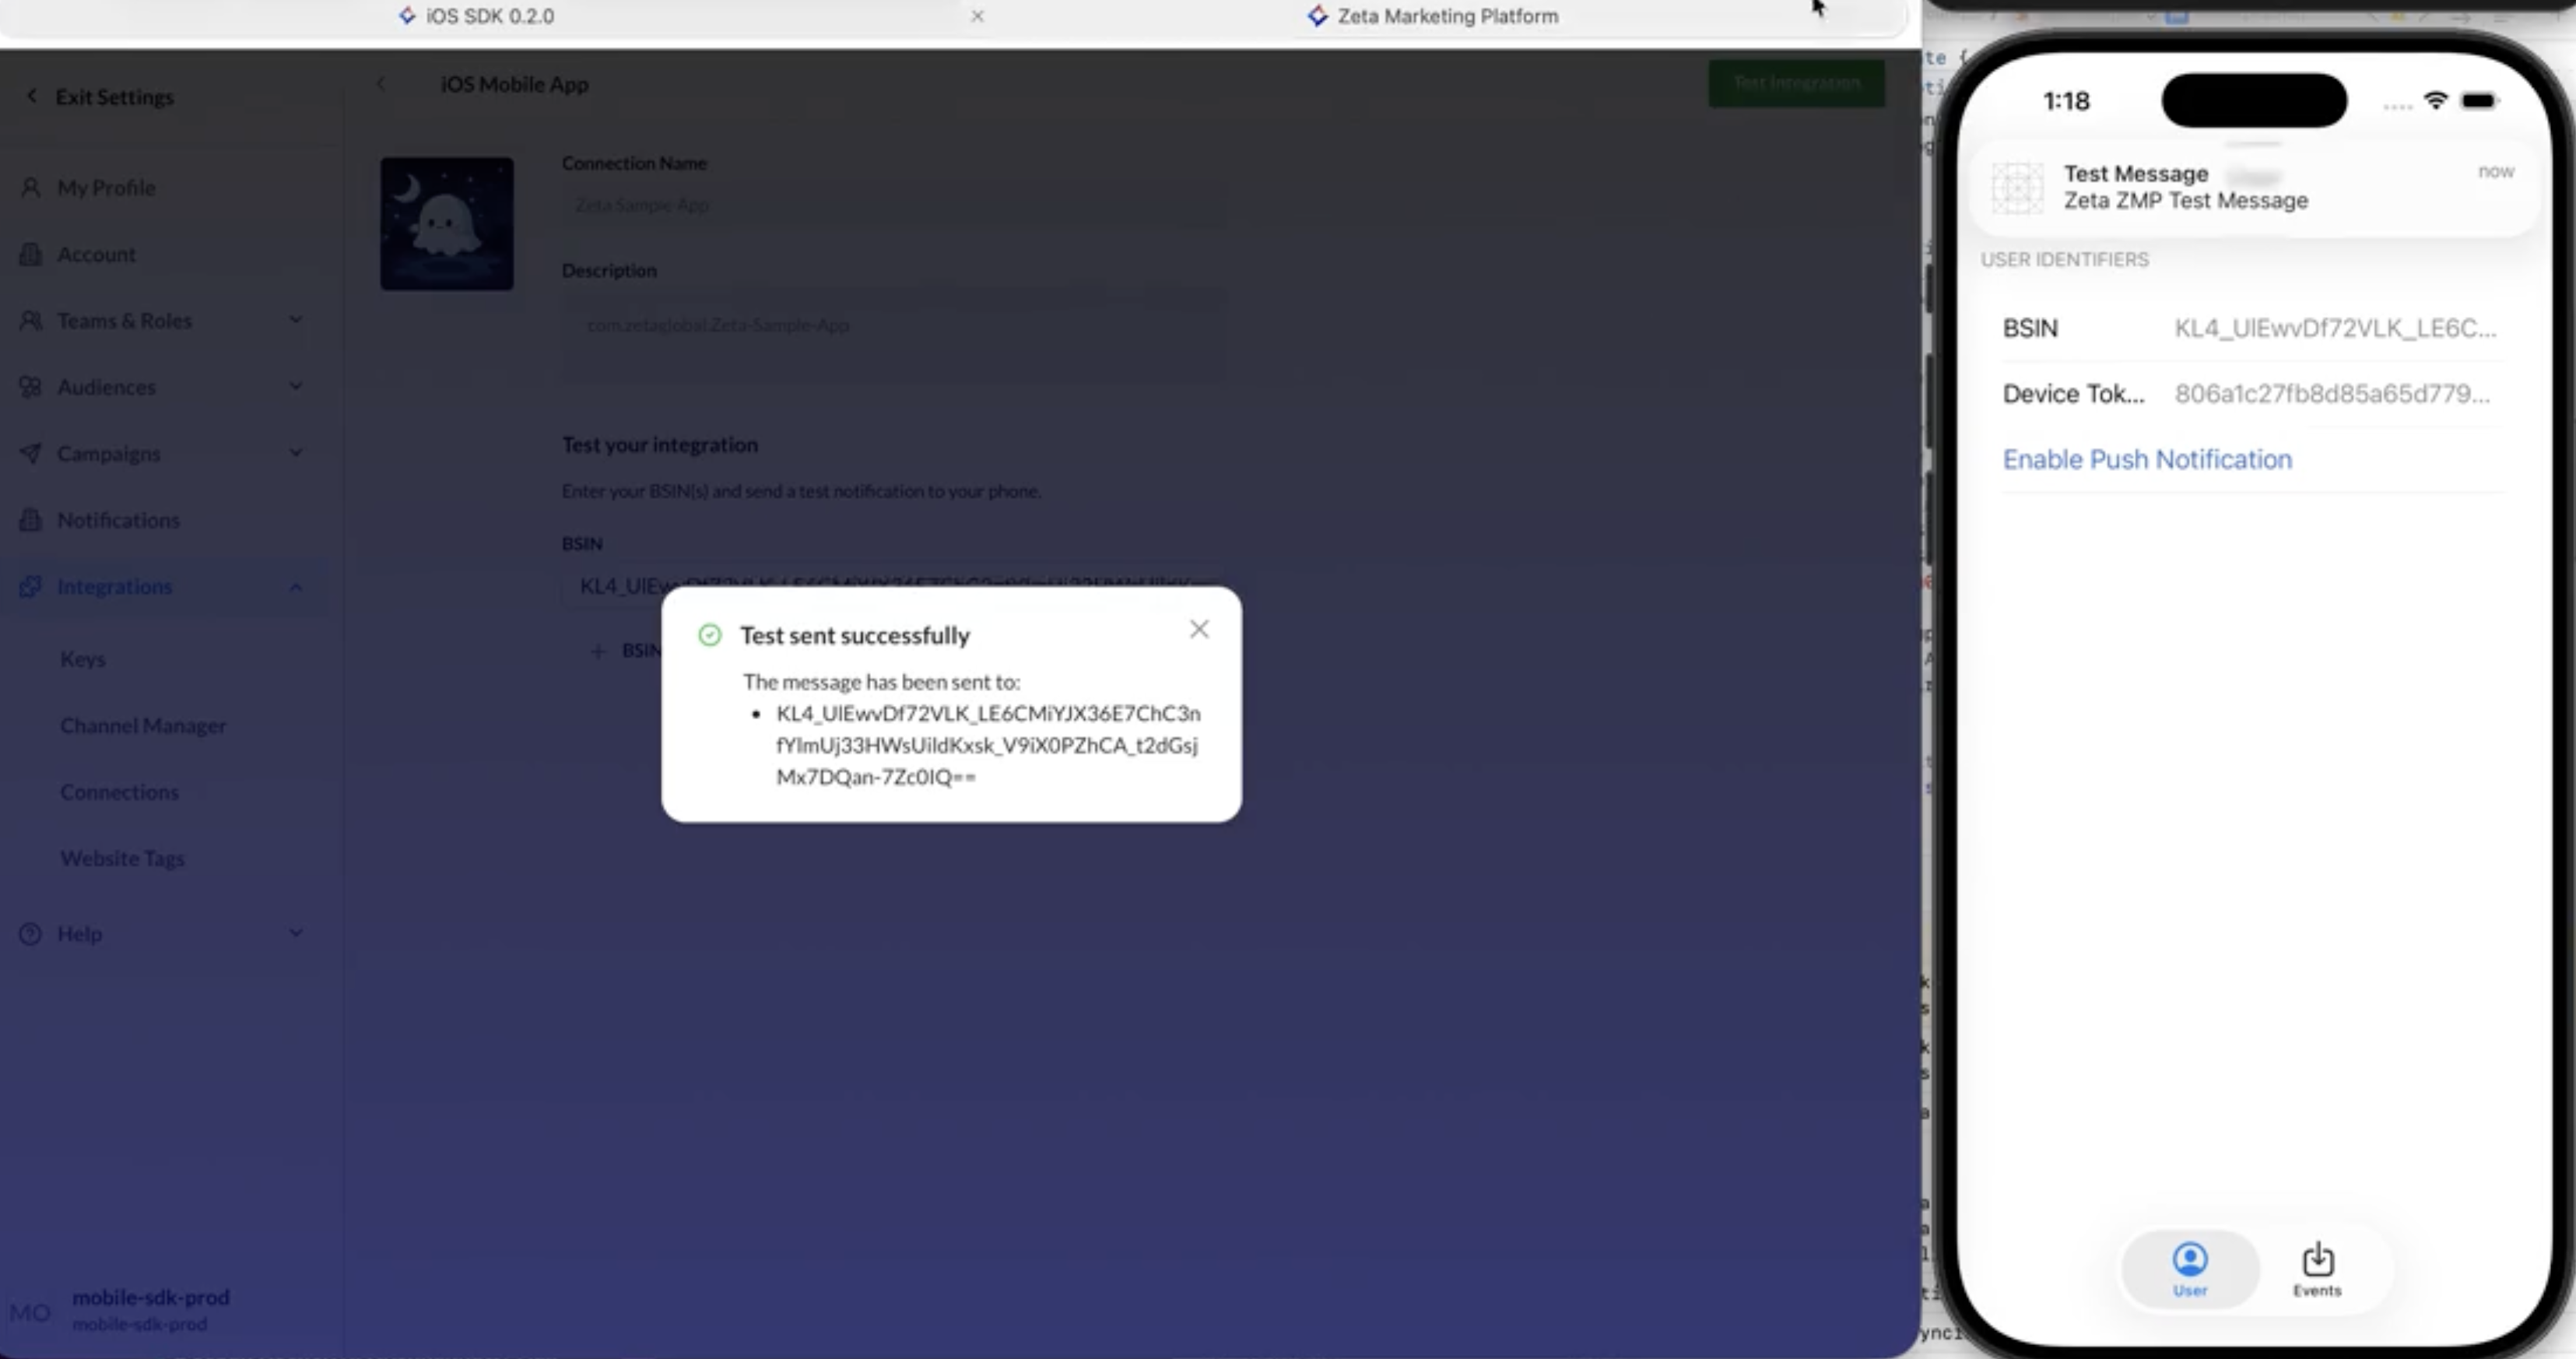
trigger push notification
received test push
For deeper diagnostics, see Testing and QA and Push Troubleshooting.
How push tracking works
The SDK reports two events back to Zeta Marketing Platform (ZMP) for each push notification your app processes.
| Event | When it fires | Your integration step |
|---|---|---|
delivered | SDK confirms the notification was received | Notification Service Extension |
message_clicked | User taps the notification | Track notification taps |
Important: On iOS,
deliveredrequires the Notification Service Extension for background notifications. Without it, delivery events will not appear in ZMP reporting even though push notifications may still reach the device. See Notification Service Extension.
FAQ
Why are delivery receipts missing for some notifications?
A missing delivered event does not mean the push failed to reach the device. Delivery receipts are device-side events generated by the SDK inside the Notification Service Extension. Receipts can be absent for any of the following reasons:
- Notification Service Extension not implemented — without the NSE, the SDK has no opportunity to fire a delivery event. See Notification Service Extension.
- Device offline at send time — APNS stores one notification per device for up to 30 days and delivers it when the device reconnects (Apple: Sending notification requests to APNs).
- Stale device token — the token becomes invalid when the user uninstalls the app or changes devices. APNS returns a
BadDeviceTokenorUnregisterederror (Apple: Handling error responses from APNs). - Rate limiting — if too many notifications are sent to the same device in a short period, APNS queues only the most recent one and silently drops earlier requests (Apple: Troubleshooting push notifications).
- Notifications disabled — the user revoked notification permission for the app in system settings.
- Silent notification throttle — APNS limits background (
content-available) notifications per day based on the device's power budget (Apple: Pushing background updates to your App).
The most reliable proof that a push was delivered is a message_clicked event — a click proves the notification reached the device and the user interacted with it.
Why is the push open rate always 0%?
Push notifications do not have an "opened" metric equivalent to email opens (pixel fire). The open rate for push campaigns is always 0% — this is expected behavior, not a bug. The meaningful engagement metric for push is message_clicked.
Where do Additional Values from the ZMP campaign builder go?
Additional Values (custom key-value pairs configured in the ZMP push campaign builder) are included in the push payload and passed through to your app via the SDK. They are a pass-through mechanism — your app is responsible for reading them and forwarding them to your own analytics pipeline.
Values are available in the extraInfo dictionary from ZTDeeplinkDelegate. See Handle deeplinks for code examples.
These values are not written back to ZMP reporting. If you need Additional Values to appear in your reporting pipeline, extract them in your tap handler and forward them to your analytics system.
Next
- Push Troubleshooting -- sandbox vs production, APNS error codes, and common issues.
- Testing and QA -- verify your push integration before release.
- In-App Messaging -- foreground, opt-in-free messages.
- User Guide: Push Notifications -- campaign setup and targeting from ZMP.
See also
- Platform support -- feature availability by platform and SDK version.