Flutter SDK 0.1.0
This guide explains how to install and use the ZetaKit Flutter plugin to integrate the native Zeta SDK (iOS/Android) into your Flutter app. It covers setup steps, configuration options, and usage examples for key features like user identity, event tracking, in-app messaging, and location tracking etc.
SDK Support and Compatibility
- Flutter SDK: Requires Flutter version 3.0.0 or higher.
- iOS: Minimum deployment target: iOS 13.0 (Zeta's iOS SDK is compatible only with iOS 13 or later). Ensure the Podfile includes
- platform: ios, '13.0'
- Android: Minimum supported version: Android 7.0 (API level 24).. Set minSdkVersion to 24 or higher in your android/app/build.gradle file.
- Android Compile SDK: No special requirement beyond including the plugin (it includes Zeta’s Android libraries). Make sure your Android project has Google Play Services and Firebase Messaging set up if using push notifications.
Native SDK compatibility
Installation
Add the Zeta plugin to your app’s pubspec.yaml under dependencies. For example:
zetakit_flutter:
    git:
      url: https://gitlab.com/zeta-crm/zetakit-flutter.git
      ref: 0.1.0
Then run:
flutter pub getIn your Dart code, import the plugin:
import 'package:zetakit_flutter/zetakit_flutter.dart';After this, you can use the ZetaCore class to access the SDK’s methods in your Flutter app.
Initializing the SDK
Before using Zeta features, initialize the SDK with your configuration. Do this once when the app starts (for example in main() before runApp()), and await initialization:
void main() async {
  WidgetsFlutterBinding.ensureInitialized();

  bool success = await ZetaCore().initialize(
    ZetaInitConfig(
      clientSiteId: "YOUR_SITE_ID",
      clientSecret: "YOUR_CLIENT_SECRET",
      optIn: true,
      region: ZetaRegion.us, // or appropriate region
      isLoggingEnabled: true,
      appGroupId: 'group.com.zetaglobal.Zeta-Sample-App',
      appEnvironment: ZTAppEnvironment.PRODUCTION)
  );

  if (success) {
    print("✅ Zeta SDK initialized successfully");
  } else {
    print("❌ Zeta SDK initialization failed");
  }
  runApp(MyApp());
}- clientSiteId / clientSecret: Obtain these from the Zeta Marketing Platform (ZMP) console when you register your app. They authenticate your app with Zeta’s servers.
- optIn: A boolean that controls whether the SDK should actively track events (true to track, false to start in an opted-out state). If you set optIn: false, the SDK will not send or store events until you opt-in later.
- region: Your ZMP region (US or EU); the correct region should be referenced from ZTRegion class. Region cannot be changed after your ZMP account is provisioned.
- isLoggingEnabled: Enable (true) to see verbose SDK logs in the console (useful for debugging); default is off.
- appGroupId (optional) appGroupdId is used to track notification delivery status, please look into Push Notification for more details
- appEnvironment: (optional) representing the application environment for the SDK , by default the parameter value will be Production. appEnvironment is used to decide the respective APNS environment for push notifications from iOS.
By default, push notification configuration is separate, so initialization only covers core analytics and identity. Make sure to replace placeholders (YOUR_SITE_ID, YOUR_CLIENT_SECRET) with your actual credentials.
How to initialize the ZetaFlutterSdk
The ZetaCore().initialize should be called in a standard application at the beginning of the lifecycle.
During this initialization, siteId, optIn and region are mandatory fields, and by default, logging will be disabled.
For the SDK to communicate with the server, clientSecretKey is required. The auth key can be provided either during the SDK initialization or through a late setClientSecret method.
ZetaCore().setClientSecret(Environment.clientSecret)Native Initialization
We can also initialize the SDK natively as per below documentation for android and iOS host applications of Flutter app.
Android:
inside Application.kt onCreate we can add the initialization
import ZetaCore
override fun onCreate() {
  val config = ZTConfig(
  clientSiteId = "YOUR_SITE_ID",
  clientSecret = "YOUR_CLIENT_SECRET",
  isLoggingEnabled = true,
  optIn = true,
  region = ZTRegion.US,
  appEnvironment: ZTAppEnvironment.PRODUCTION
  )
  ZetaClient.initialize(this, config)
}
iOS:
inside AppDelegate.swift didFinishLaunchingWithOptions we can add the initialization
import ZetaCore
func initializeSDK() {
  let config = ZTConfig(isLoggingEnabled: true,
  clientSiteId: "YOUR_SITE_ID",
  clientSecret: "YOUR_CLIENT_SECRET",
  region: ZTRegion.US,
  appGroupId: "group.com.zetaglobal.Zeta-Sample-App",
  optIn: true,
  appEnvironment: ZTAppEnvironment.PRODUCTION)
  ZetaClient.shared.initialize(config: config) {}
}
BSIN and User Session Management
Zeta uses a BSIN (Browser/Session Identification Number) to uniquely identify a user’s session. In Flutter:
- Listen for BSIN changes:
ZetaCore.onBsinChanged.listen((String newBsin) {
  // New Bsin generated
});- Get cached BSIN: Retrieve the current BSIN at any time:
String cachedBsin = await ZetaCore().getCachedBsin();Tracking Opt-in and Opt-out
When the application does not require the SDK to track events and user properties, it can utilize the opt-out feature. The application sends the opt-out configuration as part of its initialization or can call a separate opt-out method. If the application is using SDK-exposed methods for opting in or out, the same status should be sent through the SDK initialization configuration during the next launch. Otherwise, the configuration value may overwrite the opt-in/out status. Once the SDK receives the opt-out request, it will immediately stop all communication with the back end, and any data cached in the database will also be cleared. Until the application opts back in, the SDK will neither collect data from the application nor send data to the server. The application can opt in or out at any time during its lifecycle. After opting out, if the application opts back in, the SDK will consider it a fresh launch.
Tracking opt-out
Tracking of SDK can be disabled in two ways:
- Pass opt-in as false during initialization
bool success = await ZetaCore().initialize(
    ZetaInitConfig(
      clientSiteId: "YOUR_SITE_ID",
      clientSecret: "YOUR_CLIENT_SECRET",
      optIn: false,
      region: "US",
      isLoggingEnabled: true,
      appGroupId: String (IOS Specific),
      appEnvironment: ZTAppEnvironment.SANDBOX
    ),
);- Call stop tracking method
await ZetaCore().optOutFromTracking();Tracking opt-in
To start tracking again you can pass optin as true in config during await ZetaCore().initialize() or call await ZetaCore().optInForTracking(uid)
uid: At the time of opt-in, the uid field is optional for identifying the user from the SDK's perspective. If the application does not provide a user ID, the SDK will consider the user as an anonymous user.
If the application is using SDK-exposed methods for opting in or out, the same status should be sent through the SDK initialization configuration during the next launch. Otherwise, the configuration value may overwrite the opt-in/out status.
User Identification
Update User Properties
The client app can update the user data using the builder pattern or by creating a ZTUser object at the app level and calling the updateUser method to pass the data to the SDK.
await ZetaCore().setUserDetails(
  name: "John Doe",
  firstName: "John",
  lastName: "Doe",
  email: ZetaUserEmail(
    email: "[email protected]",
    additionalInfo: ZetaContactAdditionalInfo(
      subscriptionStatus: ZetaContactSubscriptionStatus.active,
    ),
  ),
  phone: ZetaUserPhone(
    phone: "+15550100000",
    additionalInfo: ZetaContactAdditionalInfo(
      subscriptionStatus: ZetaContactSubscriptionStatus.active,
    ),
  ),
  source: "mobile",
  uid: "user123",
  signedUpAt: "2023-01-01",
);
For contact information (email, phone number), the client app can also pass the additional info to the SDK.
// Complete example with all contact properties
await ZetaCore().setUserDetails(
  name: "John Doe",
  firstName: "John",
  lastName: "Doe",
  email: ZetaUserEmail(
    email: "[email protected]",
    additionalInfo: ZetaContactAdditionalInfo(
      // Engagement tracking
      lastSent: "2023-12-01T14:20:00Z",
      lastOpened: "2023-12-01T14:25:00Z",
      lastClicked: "2023-12-01T14:30:00Z",

      // User lifecycle
      signedUpAt: "2023-01-15T10:30:00Z",
      inactivityReason: "user_inactive_30_days",
      doubleOptInStatus: "confirmed",

      // Contact preferences
      preferences: ["newsletter", "promotions", "product_updates"],
      subscriptionStatus: ZetaContactSubscriptionStatus.active,

      // Custom properties for segmentation
      contactProperties: {
        "source": "mobile_app",
        "campaign": "holiday_2023",
        "segment": "premium_users",
        "tier": "gold",
        "region": "north_america",
        "language": "en",
        "timezone": "PST",
        "customAttribute1": "value1",
        "customAttribute2": "value2"
      },
    ),
  ),
  phone: ZetaUserPhone(
    phone: "+123456789",
    additionalInfo: ZetaContactAdditionalInfo(
      phoneType: "mobile",
      subscriptionStatus: ZetaContactSubscriptionStatus.active,
      preferences: ["sms_alerts", "voice_calls"],
      contactProperties: {
        "verified": "true",
        "primary": "true"
      },
    ),
  ),
  source: "mobile_app",
  uid: "user_12345",
  signedUpAt: "2023-01-15",
  additionalProperties: {
      "zt_android_test_map": {
        "key1": "value1",
        "key2": "value2"
      },
      "zt_android_test_integer": 1,
      "zt_android_test_cart_json": {
        "cart_id": "cart12345",
        "items": [
          {
            "id": "prod123",
            "name": "T-Shirt",
            "price": 19.99,
            "quantity": 2,
            "color": "blue"
          },
          {
            "id": "prod456",
            "name": "Sneakers",
            "price": 89.99,
            "quantity": 1,
            "size": 42
          }
        ],
        "subtotal": 129.97,
        "shipping": 4.99,
        "tax": 12.5,
        "total": 147.46,
        "currency": "USD"
      },
      "zt_android_test_boolean": true,
      "zt_android_test_long": 1000,
      "zt_android_test_list": [
        "item1",
        "item2",
        "item3"
      ],
      "zt_android_test_double": 1,
      "zt_android_test_string": "test"
    }
);
//ZTContactAdditionalInfo values
preference: [String] - the default value will be "standard"
subscriptionStatus: ZTContactSubscriptionStatus - value can be NEW, ACTIVE,INACTIVE, NONE
properties: Additioncal contact properties can be added through this dictionary
Notes
- All date-time should be in ISO 8601 format in UTC
- preference of contact defaults to standard but other preferences can be added/customized within the settings menu in ZMP. Only those defined values can be passed in preference
- double_opt_in_status optional field to track double opt ins - default value is null, but will accept single or double values
- phone_type optional field for phone contact types. default value is null, accepts mobile or landline values
- additionalProperties field is an optional field that can be used to include any custom key-value pairs as part of the user data payload. These custom attributes will appear under the User Properties section in ZMP.
How to start the User Identity Session
The SDK supports tracking user session-specific properties and events. Setting the uid property will facilitate session tracking.
//update uid via ZTUser
await ZetaCore().setUserDetails(name: "FlutterSdkIntegradtionGuide")
How to clear the User Identity Session
clear() method removes the currently stored user session.
await ZetaCore().clear();Note : It is recommended to invoke the clear() method whenever there is a change in the user profile within the application.
Set App Set ID and Set Advertising ID (IDFA/AAID):
//App Set Id or IDFV
await ZetaCore().setAppSetId("App Id")
//Google AdvertisementId(GAID) or IDFA
await ZetaCore().setAdvertisementId("idfv")
Location Tracking
location: This method can be called by passing the location coordinates along with foreground / background state. The foreground / background state indicates whether the location data is collected when the app is in the foreground or background.The provided location will be cached in memory, and for subsequent events, the location details will be added as a property.
 await ZetaCore().trackLocation(
        latitude,
        longitude,
        isForeground: isForeground,
      );
Event Tracking
Auto Tracked Events
- app_installed This event is generated only once when the app is launched for the first time.
- app_opened This event is generated whenever the app transitions from the background to the foreground.
- app_closed This event is generated whenever the app transitions from the foreground to the background.
Auto Tracked Event for iOS Only:
- app_terminated This event is generated whenever the app is closed.
Defined Events
Screen Name Tracking
screenName: This event is used for tracking user screen navigation. The provided screen name will be cached in memory, and for subsequent events, the screen will be added as a property.
deeplink: An optional field for specifying that this screen is opened through a deeplink URL.
properties: An optional field for specifying additional properties.
await ZetaCore().trackScreenName(
        screenName: String,
        deeplink: String?,
        properties: Map<String, Any>? ,
      );
Custom Events
The SDK accepts custom events. To send custom events, the application needs to pass the event name and properties to the SDK.
eventName: A meaningful name that describes the event.
properties: properties is a dictionary, properties should be JSON encodable and decodable.
await ZetaCore().sendCustomEvent(
        eventName: eventName,
        properties: properties
      );
If any value in properties is not serializable to JSON, the entire event will be silently discarded.
Push Notification
To update device token
await ZetaCore().updatePushToken("my Device Token")Note: We shall require Native iOS and android SDK methods for push notifications setup in the Flutter app’s iOS and android folders.
iOS:
For processing push notifications. we shall need to add below dependencies in Flutter iOS directory.app/iOS
we need to add below dependencies with Cocoapods.
- Zeta Kit is available with two pods ZetaCore and ZetaNotificationService
- Add both of these pods to your target app in Podfile
target 'YourAppTarget' do
  pod 'ZetaCore'
end
// required for rich push notifications
target 'Notification Service Extension' do
  pod 'ZetaNotificationService'
end
To track Zeta notification clicked by user
- Call ZetaClient.shared.push?.userNotificationCenter from did receive response delegate function of UNUserNotificationCenterDelegate
- This helps in tracking of user click events
- when it returns true than do not call completion handler as this is taken care by SDK
import ZetaCore
extension AppDelegate: UNUserNotificationCenterDelegate {
    func userNotificationCenter(_ center: UNUserNotificationCenter, didReceive response: UNNotificationResponse, withCompletionHandler completionHandler: @escaping () -> Void) {
        ZetaClient.shared.waitForInitialization {
        if  ZetaClient.shared.push?.userNotificationCenter(center, didReceive: response, withCompletionHandler: completionHandler) == true {
            // return without calling completion handler
            return
        }
        DispatchQueue.main.async {
          completionHandler()
        }
      }
    }
}
We can also track notification clicked by directly calling below function
import ZetaCore
extension AppDelegate: UNUserNotificationCenterDelegate {
    func userNotificationCenter(_ center: UNUserNotificationCenter, didReceive response: UNNotificationResponse, withCompletionHandler completionHandler: @escaping () -> Void) {
        ZetaClient.shared.waitForInitialization {
          ZetaClient.shared.push?.trackNotificationClicked(response: response)
          DispatchQueue.main.async {
            completionHandler()
          }
        }
    }
}
To get notified when zeta notification with deeplink is clicked
If your app uses deep links (e.g. custom URI schemes) to navigate, you can integrate Zeta’s deeplink tracking:
- Listen for deeplink events:
ZetaCore.onDeeplinkReceived.listen((Map<String, dynamic> deeplinkData) {
  print("Deeplink received: ${deeplinkData['deeplink']}");
  print("Extra info: ${deeplinkData['extraInfo']}");
  // Navigate within your app as needed
});- deeplink param will be the deeplink in notification payload passed from Zeta Campaign
- extraInfo param will be the extraInfo in notification payload passed from Zeta Campaign
To get delivery status of notification
- Create notification service extension, Import ZetaNotificationService from ZetaKit Package and add it to notification service extension target.
- Add ZetaNotificationService pods to notification service extension target in Podfile
target 'Notification Service Extension' do
  pod 'ZetaNotificationService'
end- add ZetaNotificationService.xcframework to notification service extension target
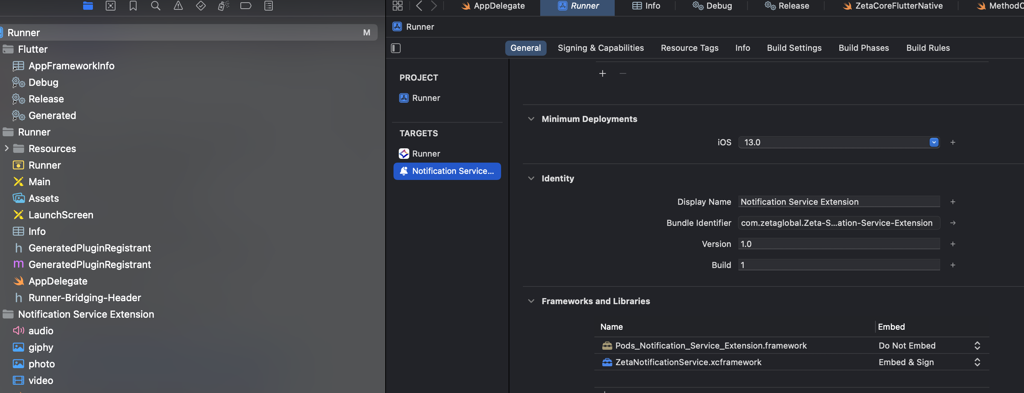
- you can use ZTNotificationService.canHandle to check if ZetaNotificationService can handle notification
- Create a app group id and pass it in ZTNotificationService.trackNotificationDelivered
ZTNotificationService is used to provide rich notification extension and track delivery of notification . There are 2 ways to use ZTNotificationService
- Make ZTNotificationService super class of NotificationService extension class
import ZetaNotificationService
import UserNotifications
class NotificationService: ZTNotificationService {
    public override func didReceive(_ request: UNNotificationRequest, withContentHandler contentHandler: @escaping (UNNotificationContent) -> Void) {
        if ZTNotificationService.canHandle(request, withContentHandler: contentHandler) {
            //If Zeta SDK can handle the notification
            //call ZTNotificationService.trackNotificationDelivered to track delivery
            //super.didreceive to handle rich notification
            ZTNotificationService.trackNotificationDelivered(request, appGroupId: "group.com.xyzapp")
            super.didReceive(request, withContentHandler: contentHandler)
            return
        }
         //handle non Zeta notification
         contentHandler(request.content)
    }
}- Use ZTNotificationService directly in your NotificationService class
import ZetaNotificationService
import UserNotifications
class NotificationService: UNNotificationServiceExtension {
    public override func didReceive(_ request: UNNotificationRequest, withContentHandler contentHandler: @escaping (UNNotificationContent) -> Void) {
        if ZTNotificationService.canHandle(request, withContentHandler: contentHandler) {
            ZTNotificationService.trackNotificationDelivered(request, appGroupId: "group.com.abc.xyzproduct")
            ZTNotificationService.handleNotification(request, withContentHandler: contentHandler)
            return
        }
        //handle non Zeta notification
        contentHandler(request.content)
    }
}
Rich Notification Support
Rich Notifications allow for more customization in your push notifications by adding additional content.This capability allows the marketer to send media-enabled push messages without developer support.
A ZMP user can upload a single media file or specify a URL for upload into their app. The media is then shown in the preview window of campaign builder. Upon receiving , the SDK downloads the media and displays it in a standard push notification.
iOS push notifications can include GIFs, images, videos.
Supported Media Types for Rich Notification:
Image files formats: JPG, GIF and PNG
Video files formats: MP4
Guidelines
We recommend a 2:1 aspect ratio (landscape) for expanded push notifications.
Images will always span the full width of the notification, and the height will adjust accordingly.
Android
To set up push notifications, the application needs to manage Firebase registration and ensure that the google-services.json file is placed in the correct path (project/app).
The push notification service will not work without Google Play services, so the application must ensure that the device has Google Play services installed.
For Android 13 and above, user permission is required to show notifications, and the application must handle this permission appropriately.
Firebase dependency
- Application needs to add the firebase dependency inside app/build.gradle file
- implementation("com.google.firebase:firebase-messaging:24.1.0")
FirebaseBefore using the library ensure we are using the latest version.
Intent Listening
Zeta supports listening to Android intents that are sent to your app. The Flutter SDK can automatically capture and process these intents, even if your app doesn't have a traditional MainActivity or uses Flutter's default activity structure.
By default, intent listening is enabled after initialization. The SDK will automatically register to receive intents and process them when they are sent to your app. This works seamlessly with Flutter projects that don't require custom MainActivity implementations.
ZetaCore.onIntentReceived.listen((ZetaIntentData intentData) {
  print("Intent received:");
  print("Action: ${intentData.action}");
  print("Data: ${intentData.dataString}");
  print("Scheme: ${intentData.scheme}");
  print("Type: ${intentData.type}");
  print("Categories: ${intentData.categories}");
  print("Extras: ${intentData.extras}");

  // Helper methods for common intent actions
  if (intentData.isViewAction) {
    print("This is a VIEW action intent");
  }

  if (intentData.isMainAction) {
    print("This is a MAIN action intent");
  }
}
Notification Click Listening
Zeta supports listening to notification click events that occur when users interact with Zeta push notifications. The Flutter SDK can automatically capture and process these notification interactions, providing access to valuable data such as deeplinks, campaign information, and custom payload data.
By default, notification click listening is enabled after initialization. The SDK will automatically register to receive notification click events and stream them through the onZetaNotificationClick stream. This allows you to handle notification interactions seamlessly, whether users tap on the notification itself or interact with action buttons, and access associated data like deeplinks for navigation or campaign tracking information for analytics.
// Listen to notification click events
ZetaCore.onZetaNotificationClick.listen((notificationData) {
  // Access basic notification information
  final id = notificationData['id'];
  final localNotificationId = notificationData['localNotificationId'];
  final title = notificationData['title'];
  final body = notificationData['body'];

  // Access optional fields
  final intentAction = notificationData['intentAction'];
  final clickAction = notificationData['clickAction'];
  final deepLink = notificationData['deepLink'];
  final extra = notificationData['extra']; // Custom payload data
  final tag = notificationData['tag'];

  // Access action button information (if notification had action buttons)
  final actionInfo = notificationData['actionInfo'];
  if (actionInfo != null) {
    final actionName = actionInfo['name'];
    final actionDescription = actionInfo['description'];
    final actionValue = actionInfo['actionValue'];
    final isForeground = actionInfo['isForeGround'];
  }

  // Handle deeplink navigation
  if (deepLink != null) {
    handleDeeplink(deepLink);
  }

  // Process custom data from the 'extra' field
  if (extra != null) {
    // Handle campaign tracking, custom parameters, etc.
    processCampaignData(extra);
  }
});
How to configure push service in native layer
- Configure the push notification and channel info
ZTPush.initConfig(
    ZTNotificationConfig(
        smallIcon = applicationInfo.icon,
        color = Color.GREEN,
        enableAppLaunch = true,
        notificationChannel = ZTNotificationChannel(
            id = "ApplicationTestChannel",
            name = "Application Test Channel",
            description = "Test Channel Description",
            showBadge = true,
            autoCancel = true,
            notificationSound = R.raw.test_ring_tone_1
        )
    )
)
ZTNotificationConfig parameters
- smallIcon : Set the small icon to use in the notification layouts.
- color : Accent color to be applied to the notification.
- enableAppLaunch : Enable SDK launch the application when user tap on it, when notification actions are missing in payload(By default this flag will be true)..
- notificationChannel : Notification channel info. If this configuration is not provided, the SDK will create a DEFAULT channel.
ZTNotificationChannel parameters
- id : Channel id
- name : Channel Name
- description : Channel description.
- showBadge : Enable/Disable badge icon for the channel(By default this flag will be true).
- autoCancel : Setting this flag will make it so the notification is automatically canceled when the user clicks it in the panel(By default this flag will be true)
- notificationSound : Resource id for the explicit sound file(Optional field)
Setting Up Push Notification Deep Linking
When a user taps on the notification, the intent will be delivered to the application. In the AndroidManifest.xml, the deep link URL must be registered to launch the activity. For example:
<intent-filter>
    <action android:name="android.intent.action.VIEW" />

    <category android:name="android.intent.category.DEFAULT" />
    <category android:name="android.intent.category.BROWSABLE" />

    <data android:scheme="com.zeta.android.demo" />
    <data android:host="home" />

</intent-filter>
Tracking Foreground Notification Deep Link Clicks
Option 1: Native Android Setup
If you have initialized the Zeta SDK in your Android Application class, you can handle push notifications natively:
The notification payload will be delivered to the registered activity through the intent. The deep link URI value can be retrieved from intent.data. To process the activity intent, pass it to the SDK. If the intent is valid, the SDK will return a valid notification info object, which can then be used for tracking. For example:
    private fun handleIntent(intent: Intent?) {
        val data = intent?.data
        data?.let { uri ->
            appViewModel.setDeepLinkUri(uri)
        }
        intent?.let {
            val notificationInfo = ZTPush.getNotificationInfo(intent)
            notificationInfo?.let {
                ZTPush.trackEvent(notificationInfo)
                ZTPush.removeNotification(
                    context = applicationContext,
                    notificationInfo.localNotificationId
                )
            }
            intent.data = null, // Clear the data after processing
        }
    }
Note: This approach requires proper Zeta SDK initialization in your Android Application class.
Option 2: Flutter-Side Handling
If you prefer to handle everything from the Flutter/Dart side or haven't set up native Android initialization, you can use the Flutter plugin's sendIntentData method:
notificationData : Map<String, dynamic>
ZetaCore().sendIntentData(notificationData);For more information about deep linking : Create Deep Links to App Content | App architecture | Android Developers
Setting Up Push Notification Action Callback
- Foreground Action
When a user taps on a notification action button while in the foreground, the respective action will be delivered to the application. The application should register the specified action in the activity's configuration section in theAndroidManifest.xml. For example:
<intent-filter>
    <action android:name="com.zeta.demoapp.open_notification" />
    <category android:name="android.intent.category.DEFAULT" />
</intent-filter>- Tracking Foreground Action Button Clicks in native layer
The notification payload will be delivered to the registered activity through the intent. To process the activity intent, pass it to the SDK. If the intent is valid, the SDK will return a valid notification info object, which can then be used for tracking. For example:
val notificationInfo = ZTPush.getNotificationInfo(intent)
notificationInfo?.let {
    ZTPush.trackEvent(notificationInfo)
    //Removing notifcation from the system tray.
    ZTPush.removeNotification(
        context = applicationContext,
        notificationInfo.localNotificationId
    )
}- Background Action button
When a user taps on a background action button, the SDK will pass the callback to the method below. Once this method is invoked, the application can process it. For this action, the SDK will automatically create the event:
ZTPush.setActionBackgroundCallback { data ->
   //Process the noticiation background action click
}
Custom Push Service in native layer
If you want to use your own custom PushService, implement the following method to send the device token to the server in the onNewToken method:
override fun onNewToken(token: String) {
    super.onNewToken(token)
//    Once the token is ready and the SDK is not yet initialized:
    ZetaClient.updatePushToken(applicationContext, token)

//    After the SDK has been initialized:
    ZetaClient.user.updatePushToken(token = "token12345")
}
Additional Details:
If the application uses the SDK for push service(ZTPushService), the device token will be automatically captured.
Processing Push Notifications
To process the push notifications, use the following method:
 ZTPush.handleMessage(
            context = applicationContext,
            remoteMessage = message
        )
If the above method returns true, the SDK is able to process the notification. If it returns false, the application needs to handle the notification accordingly.
Delivery Status of Push Notifications
The SDK automatically captures the delivery status of push notifications in both cases(in service/Custom Service)
How to handle non zeta notification?
For handling unfamiliar notifications, the application can register a callback lambda method in ZTPush.
ZTPush.setNonZtNotificationCallback {remoteMessage->
    Log.d("ZTDemoApp", "Unknown notification received:$remoteMessage")
}
How to set notification callback for zeta notification.
If the application wants to perform an additional task when the Zeta notification arrives, the application registers a callback for the Zeta notification
ZTPush.setZtNotificationCallback {data->
    Log.d("ZTDemoApp", "Received Zeta notification: $data")
}
In App Message
In-app push messaging allows marketers to queue up toaster-style messages within their app that will display when users open the app. Opt-in/consent is not required, so deliverability is near 100% of app install base. This message type is great for highly contextual, low urgency messages.
In-app messages are displayed within mobile app without requiring any additional permissions.
The SDK uses a polling mechanism to fetch in-app messages. Once a message is received, the SDK evaluates the app state to determine if it should display the in-app message. If conditions are met, an in-app message dialog will be shown.
To monitor in-app messages, the SDK provides an in-app message lifecycle callback that can be configured from the application
Start and Stop In App Messages
In App message is enabled by default, but if the app needs to stop in app message the app can call:
await ZetaCore().stopInApp();To restart In App message again, the app can call:
await ZetaCore().startInApp();Note: The SDK does not persist the stop state; the application must manage this state. By default, the SDK will start displaying in-app messages on app launch.
In-App Messaging
Zeta supports in-app messages (toaster/popups displayed within your app). The Flutter SDK can listen for these and display them automatically.
Enable in-app messages: By default, in-app messaging is enabled after initialization. The SDK will poll Zeta’s server for messages and show them when appropriate.
Then listen for events:
// messageData: Map<String, dynamic>
ZetaCore.onInAppWillAppear.listen((messageData) {
  print("In-app message will appear: $messageData");
});
ZetaCore.onInAppDidAppear.listen((messageData) {
  print("In-app message did appear: $messageData");
});
ZetaCore.onInAppClicked.listen((messageData) {
  print("In-app message clicked: $messageData");
});
ZetaCore.onInAppDismissed.listen((messageData) {
  print("In-app message dismissed: $messageData");
});
Check status: You can query whether in-app messaging is active:
bool isActive = await ZetaCore().getInAppStatus();
print("In-app messaging active: $isActive");
How to Create an In-App Message
- Access the ZMP Portal
- Log in to the ZMP portal.
- Configure the Campaign
- Navigate to the campaign window.
- Select the channel as 'Mobile InApp Push'.
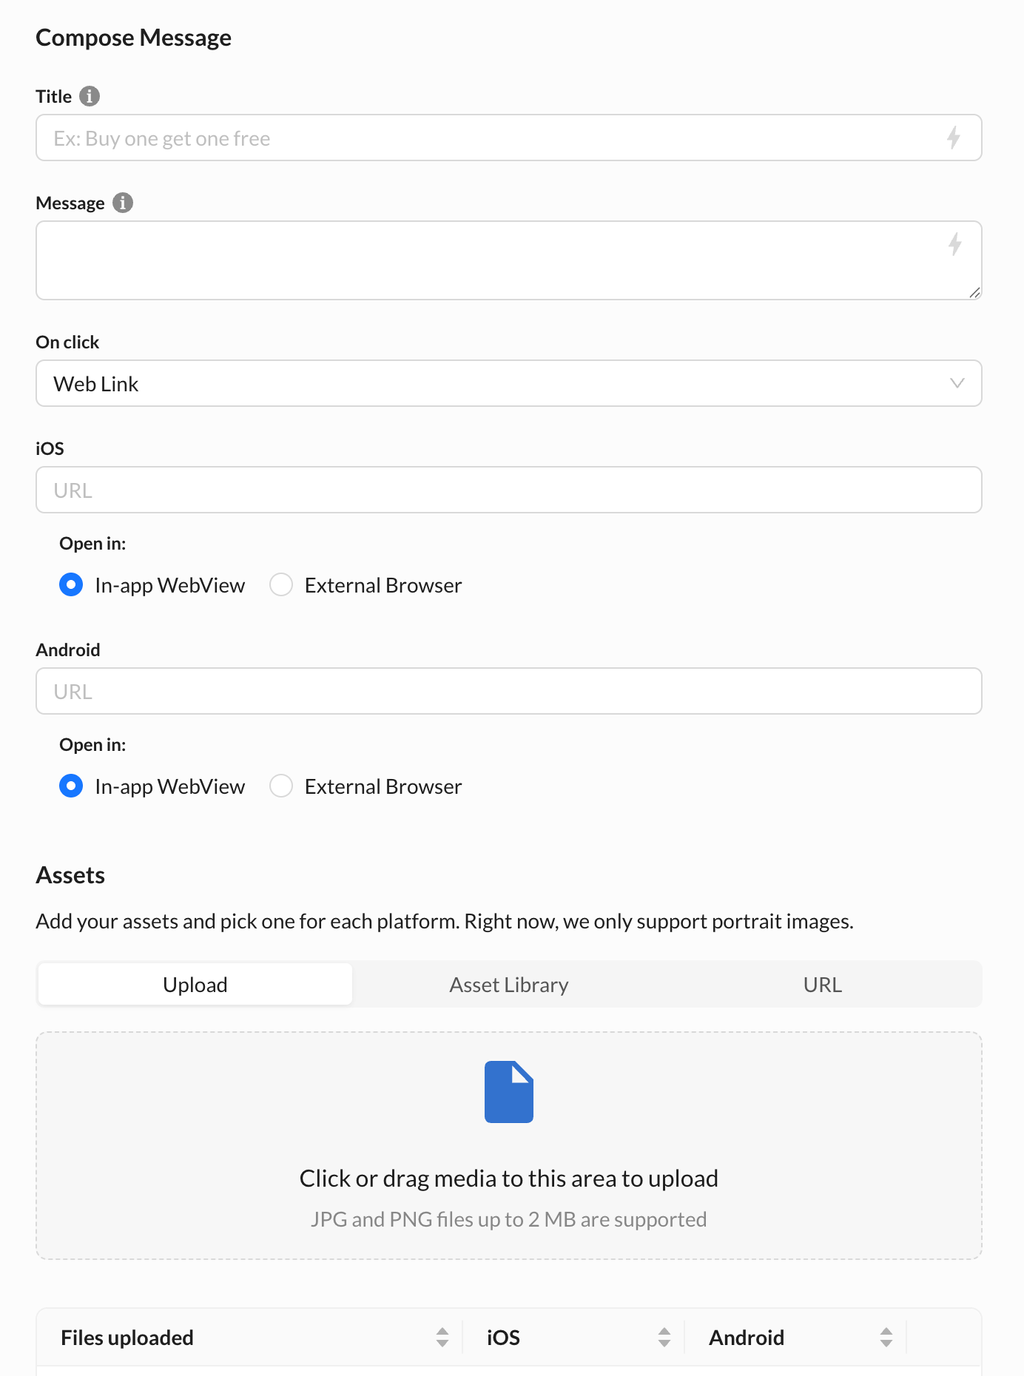
- Compose the Message
- Click on the In-App Messaging Setup content area to begin composing your message.
- Message Composition Steps
- Title: Provide a title for your message.
- Body: Provide the body of your message
- OnClick Options: Choose one of the following actions for when a user taps on the message:
- Deep Link: When the user taps on the message, the SDK will deliver the deep link URL to the application through a delegate method. The application must handle internal redirection.
- Dismiss: No action will be performed when the message is clicked.
- Web Link: The specified URL will open in a browser view when tapped.
- In-App Web View: The specified URL will open inside the SDK in SFSafariViewController
- External Browser: The specified URL will open in the device's default browser.
- In-App Message Image (Optional): An image can be specified through available options.
- Finalize Your Message
- After composing your message, click on the Done button.
- Activate the Campaign
- Activate your campaign from the portal to start displaying in-app messages.
Updated about 1 month ago