iOS SDK 0.2.0
Install & Setup the Zeta iOS SDK
Requirements
- Minimum supported version: iOS 13+/ iPadOS 13+
- Requires Xcode 14+ (setup instructions use Xcode 26.0+)
Install the Zeta iOS SDK
The Zeta iOS SDK supports installation using Swift Package Manager, CocoaPods, or prebuilt XCFrameworks.
Swift Package Manager is the recommended integration method.
Install via Swift Package Manager (Recommended)
- Open your project in Xcode.
- Select your project in the Project navigator.
- Select your app target, then open the Package Dependencies tab.
- Click Add (+).
- Enter the package URL:
https://gitlab.com/zeta-crm/zetakit-swift - Select a version rule.
Up to Next Major Version is recommended. - Click Add Package.
Select SDK Products
Choose the products you want to add to your target.
Available products:
- ZetaCore
Required.
Provides core SDK functionality. - ZetaNotificationService
Optional. Add only to a Notification Service Extension target.
Rich push notifications support.
Select the required products and click Add Package to complete installation.
Note
- SDK versions follow Semantic Versioning. Pin versions only if required for stability.
- Each SDK module is independently buildable, allowing minimal integration.
- Add ZetaNotificationService only to your Notification Service Extension target.
For more details on managing Swift Package dependencies, refer to Apple’s official documentation on Swift Package Manager.
Install via Cocoapods
ImportantCocoaPods is no longer under active development. Refer to the official project blog for the latest status. The Zeta iOS SDK will continue to support existing CocoaPods integrations for as long as possible; however, new projects should use Swift Package Manager.
Steps
-
Install CocoaPods if you haven’t already:
gem install cocoapods -
Navigate to your project directory in Terminal.
-
Create a Podfile (if one doesn’t exist):
pod init -
Open your
Podfileand add the ZetaKit pods.target 'YourAppTarget' do pod 'ZetaCore' end # Required for rich push notifications # Notification Service Extension target only (not the app target) target 'YourNotificationServiceExtensionTarget' do pod 'ZetaNotificationService' end -
Install dependencies:
pod install -
Open the
.xcworkspacefile generated by CocoaPods.
Notes
- Do not add
ZetaNotificationServiceto the main app target. - CocoaPods releases follow the same semantic versioning as SPM.
- CocoaPods support may be deprecated in a future major release.
Install via Prebuilt Binary XCFramework
Use binary distribution for faster CI builds or restricted environments.
Download
Prebuilt XCFrameworks are available on the public repository:
https://gitlab.com/zeta-crm/zetakit-swiftDownload the required XCFrameworks:
- ZetaCore.xcframework
- ZetaNotificationService.xcframework (extension only)
Add XCFrameworks to Xcode
- Open your Xcode project.
- Select your app target.
- Go to General → Frameworks, Libraries, and Embedded Content.
- Click + and add ZetaCore.xcframework
- Set Embed & Sign.
For Notification Service Extensions:
- Add ZetaNotificationService.xcframework only to the extension target.
Import Modules
Import the SDK modules where needed. Import names match the product names.
import ZetaCore// add below line in a objective c bridging header
@import ZetaCore;For Notification Service Extensions:
import ZetaNotificationService// add below line in a objective c bridging header
@import ZetaNotificationService;Mobile App Registration
Please follow the instructions outlined in the provided link to register your app with the ZMP platform: https://knowledgebase.zetaglobal.com/kb/mobile-app-registration
Initialize SDK
import ZetaCore

// Create a zeta config object, pass in below details
let zetaConfig = ZTConfig(
    isLoggingEnabled: true,
    clientSiteId: Environment.clientSiteId,
    clientSecret: Environment.clientSecret,
    region: .US,
    appGroupId: "group.xyz.app",
    optIn: true,
    appEnvironment: ZTAppEnvironment.PRODUCTION
)

// Call initialize method from shared instance of ZetaClient
ZetaClient.shared.initialize(config: zetaConfig)
@import ZetaCore
// Create a zeta config object, pass in below details
ZTConfig *config = [
[ZTConfig alloc]
initWithIsLoggingEnabled: TRUE
clientSiteId: Environment.clientSiteId
clientSecret: Environment.clientSecret
region: .US
appGroupId:@"group.xyz.app"
optIn: TRUE
appEnvironment: ZTAppEnvironmentPRODUCTION
];
// Call initialize method from shared instance of ZetaClient
[ZetaClient.shared initializeWithConfig:config completionBlock:^{
}];ZTConfig parameters
- clientSiteId - will be provided from ZMP console post successful app registration
- clientSecret (optional) - will be provided from ZMP console post successful app registration
- isLoggingEnabled - The value for enabling SDK logs, by default the parameter value will be disabled, logs can be viewed in console app (console app)
- optIn- The value of enabling the SDK to track events and send data to the backend.
- region- Your ZMP region (US or EU); the correct region should be referenced from ZTRegion class. Region cannot be changed after your ZMP account is provisioned.
- appGroupId (optional): appGroupId is used to track notification delivery status, please look into Push Notification for more details
- appEnvironment (optional) Enum representing the application environment for the SDK , by default the parameter value will be Production. appEnvironment is used to decide the respective APNS environment for push notifications from iOS.
How to initialize the ZetaClient
The ZetaClient should be initialized inside the didFinishLaunchingWithOptions of your app.
During this initialization, siteId, optIn and region are mandatory fields, and by default, logging will be disabled.
For the SDK to communicate with the server, an clientSecretKey is required. The auth key can be provided either during the SDK initialization or through a late setClientSecret method.
ZetaClient.shared.setClientSecret(Environment.clientSecret)
How get the BSIN from the SDK?
BSIN uniquely identifies the user in ZMP
- To get cached BSIN use
ZetaClient.shared.getCachedBSIN() - To listen to lifecycle changes of BSIN, you can set delegate
ZetaClient.shared.user?.setIdentityDelegate(delegate: self)
Notes
- Intialisation can be called on main thread as heavy work is scheduled in background thread
Tracking Opt-in and Opt-out
When the application does not require the SDK to track events and user properties, it can utilize the opt-out feature. The application sends the opt-out configuration as part of its initialization or can call a separate opt-out method. If the application is using SDK-exposed methods for opting in or out, the same status should be sent through the SDK initialization configuration during the next launch. Otherwise, the configuration value may overwrite the opt-in/out status. Once the SDK receives the opt-out request, it will immediately stop all communication with the back end, and any data cached in the database will also be cleared. Until the application opts back in, the SDK will neither collect data from the application nor send data to the server. The application can opt in or out at any time during its lifecycle. After opting out, if the application opts back in, the SDK will consider it a fresh launch.
Tracking opt-out
Tracking of SDK can be disabled in two ways:
-
Pass opt-in as false during initialization
// Create a zeta config object, pass in below details
let zetaConfig = ZTConfig(
    isLoggingEnabled: true,
    clientSiteId: Environment.clientSiteId,
    clientSecret: Environment.clientSecret,
    region: .US,
    appGroupId: "group.xyz.app",
    optin: false,
    appEnvironment: ZTAppEnvironment.PRODUCTION
)

// Call initialize method from shared instance of ZetaClient
ZetaClient.shared.initialize(config: zetaConfig)
// Create a zeta config object, pass in below details ZTConfig *config = [ [ZTConfig alloc] initWithIsLoggingEnabled: TRUE clientSiteId: Environment.clientSiteId clientSecret: Environment.clientSecret region: .US appGroupId:@"group.xyz.app" optIn: FALSE appEnvironment: ZTAppEnvironmentPRODUCTION ]; // Call initialize method from shared instance of ZetaClient [ZetaClient.shared initializeWithConfig:config completionBlock:^{ }]; -
Call stop tracking method
-
ZetaClient.shared.optOutFromTracking()[ZetaClient.shared optOutFromTracking];
NoteThe opt-out status is maintained locally on the device. This status is not communicated to the backend. Since the backend remains unaware of the opt-out status, it may continue to attempt communication with the device through push notifications. The SDK will not process or act upon these messages while in the opted-out state.
Tracking opt-in
To start tracking again you can pass optin as true during ZetaClient.shared.initialize or call ZetaClient.shared.optInForTracking(uid: uid)
uid: At the time of opting in, the uid field is optional for identifying the user from the SDK's perspective. If the application does not provide a user ID, the SDK will consider the user as an anonymous user.
User Identification
Update User Properties
The ZTUserManagable protocol is exposed from the ZetaClient for performing user operations. The client app can update the user data using the builder pattern or by creating a ZTUser object at the app level and calling the updateUser method to pass the data to the SDK.
// Update user via builder method
ZetaClient.shared.user.build { user in
    user.uid = "uid"
    user.firstName = "User1"
    user.lastName = "last-name"
    user.name = "name"
    user.signedUpAt = "2024-09-17T05:54:58.000Z"
    user.source = "source"
    user.email = ZTUserEmail(email: "[email protected]")
    user.emailId = "[email protected]" // only accepted if uid is not email
    user.phone = ZTUserPhone(phone: "1234")
    user.additionalProperties = [
        "zt_test_string": "zt_test_value",
        "zt_test_number": 123,
        "zt_test_boolean": true,
        "zt_test_array": [
            "zt_test_value1",
            "zt_test_value2",
            "zt_test_value3"
        ],
        "zt_test_dict": [
            "zt_test_dict_key": "zt_test_dict_value"
        ]
    ]
}

// Update user via passing ZTUser object to update user
var user = ZTUser(name: "John Wick")
ZetaClient.shared.user.updateUser(user)
// Update user via builder method
[[ZetaClient shared].user build:^(ZTUser *user) {
user.uid = @"uid";
user.firstName = @"User1";
user.lastName = @"last-name";
user.name = @"name";
user.signedUpAt = @"2024-09-17T05:54:58.000Z";
user.source = @"source";
user.emailId = @"[email protected]"; // only accepted if uid is not email
ZTContactAdditionalInfo * ztAdditionalInfo = [[ZTContactAdditionalInfo alloc] init];
ZTUserEmail* ztEmail = [[ZTUserEmail alloc] initWithEmail:@"[email protected]" additionalInfo:ztAdditionalInfo];
user.email = ztEmail;
ZTContactAdditionalInfo * ztAdditionalInfoPhone = [[ZTContactAdditionalInfo alloc] init];
ZTUserPhone* ztPhone = [[ZTUserPhone alloc] initWithPhone:@"1234" additionalInfo:ztAdditionalInfo];
user.phone = ztPhone;
user.additionalProperties = @{
@"zt_test_string": @"zt_test_value",
@"zt_test_number": @123,
@"zt_test_boolean": @YES,
@"zt_test_array": @[
@"zt_test_value1",
@"zt_test_value2",
@"zt_test_value3"
],
@"zt_test_dict": @{
@"zt_test_dict_key": @"zt_test_dict_value"
}
};
}];
// Update user via passing ZTUser object to update user
ZTContactAdditionalInfo * ztAdditionalInfo = [[ZTContactAdditionalInfo alloc] init];
ZTUserEmail* ztEmail = [[ZTUserEmail alloc] initWithEmail:@"[email protected]" additionalInfo:ztAdditionalInfo];
ZTContactAdditionalInfo * ztAdditionalInfoPhone = [[ZTContactAdditionalInfo alloc] init];
ZTUserPhone* ztPhone = [[ZTUserPhone alloc] initWithPhone:@"1234" additionalInfo:ztAdditionalInfo];
ZTLocation* location = [[ZTLocation alloc] initWithLatitude:12.933663251837913 longitude:77.62168405034637 isForeground:TRUE];
ZTUser *user = [[ZTUser alloc]
initWithUid:@"uid"
emailId:@"[email protected]"
firstName:@"User1"
lastName:@"last-name"
name:@"John Wick"
signedUpAt:@"2024-09-17T05:54:58.000Z"
email:ztEmail
phone:ztPhone
source:@"source"
location:location
additionalProperties: @{
@"zt_test_string": @"zt_test_value",
@"zt_test_number": @123,
@"zt_test_boolean": @YES,
@"zt_test_array": @[
@"zt_test_value1",
@"zt_test_value2",
@"zt_test_value3"
],
@"zt_test_dict": @{
@"zt_test_dict_key": @"zt_test_dict_value"
}
}];
[[ZetaClient shared].user updateUser:user];user.emailId:Use this when email should be treated as a unique identifier for the user. This will populate the Email field under the ZMP Identifiers {as well as the Contact for this Email}- ⚠️ Important: If the
uidis set as an email address in the same submission, theemailIdvalue will be ignored. user.email:Use this when you want to add the email as a contact channel {only} with additional properties (preferences, subscription status, etc.). This will used as the Contact section.
For contact information (email, phone number), the client app can also pass the additional info to the SDK.
// We can update contacts with additional properties if needed
ZetaClient.shared.user?.build({ user in
    let ztAdditionalInfo = ZTContactAdditionalInfo()
    ztAdditionalInfo.subscriptionStatus = ZTContactSubscriptionStatus.active
    ztAdditionalInfo.inactivityReason = "reason"
    ztAdditionalInfo.signedUpAt = "2024-09-17T05:54:58.000Z"
    ztAdditionalInfo.lastOpened = "2024-09-17T05:54:58.000Z"
    ztAdditionalInfo.doubleOptInStatus = "single"
    ztAdditionalInfo.phoneType = "mobile"
    ztAdditionalInfo.lastSent = "2024-09-17T05:54:58.000Z"
    ztAdditionalInfo.lastOpened = "2024-09-17T05:54:58.000Z"
    ztAdditionalInfo.lastClicked = "2024-09-17T05:54:58.000Z"
    ztAdditionalInfo.properties = ["key": "value"]

    user.email = ZTUserEmail(email: value, additionalInfo: ztAdditionalInfo)
})/// ZTContactAdditionalInfo properties
///
/// - preference: [String]
/// Optional. Defaults to `["standard"]` if not provided.
///
/// - subscriptionStatus: ZTContactSubscriptionStatus
/// The contact’s subscription state.
/// Supported values: `new`, `active`, `inactive`, `none`.
///
/// - contactProperties: [String: Any]
/// Optional. A dictionary of additional custom contact properties.Notes
- All date-time should be in
ISO 8601 format in UTC preferenceof contact defaults to standard but other preferences can be added/customized within the settings menu in ZMP. Only those defined values can be passed in preferencedouble_opt_in_statusoptional field to track double opt ins - default value is null, but will accept single or double valuesphone_typeoptional field for phone contact types. default value is null, accepts mobile or landline valuesadditionalPropertiesfield is an optional field that can be used to include any custom key-value pairs as part of the user data payload. These custom attributes will appear under the User Properties section in ZMP.
How to start the User Identity Session
The SDK supports tracking user session-specific properties and events. Setting the uid or emailId property will facilitate session tracking
//update uid and emailId via builder pattern
ZetaClient.shared.user.build { user in
     user.uid = "uid"
     user.emailId = "[email protected]"
}
// Note: EmailId will be ignored if user is passing uid as email

//update uid and emailId via ZTUser
var user = ZTUser(uid: "john123", emailId: "[email protected]")
ZetaClient.shared.user.updateUser(user)

// Using user Unique Client Id
ZetaClient.shared.user.setUniqueClientId(_ value: String, forKey name: String)
How to clear the User Identity Session
ZetaClient.shared.user?.clear()Note: It is recommended to invoke the clear() method whenever there is a change in the user profile within the application.
To pass IDFA, IDFV and push token
// Pass device token to SDK
func application(_ application: UIApplication, didRegisterForRemoteNotificationsWithDeviceToken deviceToken: Data) {
    ZetaClient.shared.user?.updateDeviceToken(token: deviceToken)
}

// Pass IDFA
ZetaClient.shared.user?.updateIDFA(idfa)

// Pass IDFV
ZetaClient.shared.user?.updateIDFV(idfv)
Location Tracking
location: This method can be called by passing the location coordinates along with foreground / background state. The foreground / background state indicates whether the location data is collected when the app is in the foreground or background.The provided location will be cached in memory, and for subsequent events, the location details will be added as a property.
ZetaClient.shared.user?.updateLocation(
    ZTLocation(
        latitude: 12.933663251837913,
        longitude: 77.62168405034637,
        isForeground: true
    )
)
Unique Client Id
The SDK supports host apps providing unique_client_id to ZMP. When passing the unique_client_id to the SDK, ensure you understand these conditions:
- No two profiles may have the same
unique_client_idname:value. If a profile is updated with aunique_client_idthat is the same as another profile, the profiles will merge. - Unique Client ID pair shall be discarded if same key already exists with different value.
- Enabling support for a unique client ID requires updates to the site configuration. Please coordinate with your account team to ensure the configuration is set up correctly. Using an incorrect or mismatched client ID name may result in errors.
ZetaClient.shared.user.setUniqueClientId(_ value: String, forKey name: String)Event Tracking
Auto Tracked Events
app_installedThis event is generated only once when the app is launched for the first time.app_openedThis event is generated whenever the app transitions from the background to the foreground.app_closedThis event is generated whenever the app transitions from the foreground to the background.app_terminatedThis event is generated whenever the app is closed
Defined Events
Screen Name Tracking
screen: This event is used for tracking user screen navigation. The provided screen name will be cached in memory, and for subsequent events, the screen will be added as a property.
deeplink: An optional field for specifying that this screen is opened through a deeplink URL.
properties: An optional field for specifying additional properties.
ZetaClient.shared.event?.trackScreenName(
    screen: "Events Screen",
    deeplink: "app://home",
    properties: ["screen" : "Home"]
)
Custom Events
The SDK accepts custom events. To send custom events, the application needs to pass the event name and properties to the SDK.
eventName: A meaningful name that describes the event.
properties: properties is a dictionary of type [String: Any], properties should be JSON encodable and decodable. If any property value is not JSON encodable, the entire event will be discarded.
ZetaClient.shared.event?.send(
    name: "EventTest",
    properties: [
        "events-array": ["screen1", "screen2"],
        "events-dict": ["screen": "events"]
    ])
Push Notification
To update device token
func application(_ application: UIApplication, didRegisterForRemoteNotificationsWithDeviceToken deviceToken: Data) {
    ZetaClient.shared.user?.updateDeviceToken(token: deviceToken)
}
Handling Push Token Updates in IOS App Update Scenarios
When integrating the SDK into an existing IOS application, developers must ensure that the device push token is explicitly passed to the SDK using the following method:
ZetaClient.shared.user?.updateDeviceToken(token: deviceToken)During app updates, application(_:didRegisterForRemoteNotificationsWithDeviceToken:)method is not guaranteed to be triggered automatically. As a result, the previously cached token may not be relayed to the SDK after the update.
To ensure the SDK receives the latest token, explicitly invoke the delegate method by adding the code below.
if UIApplication.shared.isRegisteredForRemoteNotifications {
    UIApplication.shared.registerForRemoteNotifications()
}
To maintain reliable push notification delivery, the application should always provide a valid device push token to the SDK—either during app launch or after obtaining a new token.
To track Zeta notification clicked by user
- Call
ZetaClient.shared.push?.userNotificationCenterfrom did receive response delegate function of UNUserNotificationCenterDelegate - This helps in tracking of user click events
- when it returns true than do not call completion handler as this is taken care by SDK
extension AppDelegate: UNUserNotificationCenterDelegate {
    func userNotificationCenter(_ center: UNUserNotificationCenter, didReceive response: UNNotificationResponse, withCompletionHandler completionHandler: @escaping () -> Void) {
        if ZetaClient.shared.push?.userNotificationCenter(center, didReceive: response, withCompletionHandler: completionHandler) == true {
            // Return without calling completion handler
            return
        }

        completionHandler()
    }
}
We can also track notification clicked by directly calling below function
extension AppDelegate: UNUserNotificationCenterDelegate {
    func userNotificationCenter(_ center: UNUserNotificationCenter, didReceive response: UNNotificationResponse, withCompletionHandler completionHandler: @escaping () -> Void) {
        ZetaClient.shared.push?.trackNotificationClicked(response: response)
        completionHandler()
    }
}
To get notified when zeta notification with deeplink is clicked
- Set
ZTDeeplinkDelegatedelegate after initialising Zeta SDK usingZetaClient.shared.push?.setDeeplinkDelegate - Call
ZetaClient.shared.push?.userNotificationCenteras highlighted above
// Set deeplink delegate after initializing Zeta SDK
ZetaClient.shared.push?.setDeeplinkDelegate(deeplinkDelegate: self)// You will get a callback with deeplink and any extra-info sent from ZMP Campaign
public protocol ZTDeeplinkDelegate: AnyObject {
func receivedDeeplink(deeplink: String, extraInfo: [String: String]?)
}func receivedDeeplink(deeplink: String, extraInfo: [String: String]?)
deeplinkparam will be thedeeplinkin notification payload passed from Zeta CampaignextraInfoparam will be theextraInfoin notification payload passed from Zeta Campaign
To get delivery status of notification
- Create notification service extension, Import
ZetaNotificationServicefrom ZetaKit Package and add it to notification service extension target - use
ZTNotificationServiceas suggested below in documentation - you can use
ZTNotificationService.canHandleto check if ZetaNotificationService can handle notification - Create a app group id and pass it in
ZTNotificationService.trackNotificationDelivered
ZTNotificationService is used to provide rich notification extension and track delivery of notification . There are 2 ways to use ZTNotificationService
- Make ZTNotificationService super class of NotificationService extension class
import ZetaNotificationService
import UserNotifications

class NotificationService: ZTNotificationService {

    public override func didReceive(_ request: UNNotificationRequest, withContentHandler contentHandler: @escaping (UNNotificationContent) -> Void) {
        if ZTNotificationService.canHandle(request, withContentHandler: contentHandler) {
            // If Zeta SDK can handle the notification
            // Call ZTNotificationService.trackNotificationDelivered to track delivery
            // super.didreceive to handle rich notification
            ZTNotificationService.trackNotificationDelivered(request, appGroupId: "group.com.xyzapp")
            super.didReceive(request, withContentHandler: contentHandler)
            return
        }

        // Handle non Zeta notification
        contentHandler(request.content)
    }
}-
Use ZTNotificationService directly in your NotificationService class
-
import ZetaNotificationService
import UserNotifications

class NotificationService: UNNotificationServiceExtension {

    public override func didReceive(_ request: UNNotificationRequest, withContentHandler contentHandler: @escaping (UNNotificationContent) -> Void) {

        if ZTNotificationService.canHandle(request, withContentHandler: contentHandler) {
            ZTNotificationService.trackNotificationDelivered(request, appGroupId: "group.com.abc.xyzproduct")
            ZTNotificationService.handleNotification(request, withContentHandler: contentHandler)
            return
        }

        // Handle non Zeta notification
        contentHandler(request.content)
    }
}
Rich Notification Support:
Rich Notifications allow for more customization in your push notifications by adding additional content.This capability allows the marketer to send media-enabled push messages without developer support.
A ZMP user can upload a single media file or specify a URL for upload into their app. The media is then shown in the preview window of campaign builder. Upon receiving , the SDK downloads the media and displays it in a standard push notification.
iOS push notifications can include GIFs, images, videos.
Supported Media Types for Rich Notification:
Image files formats: JPG, GIF and PNG
Video files formats: MP4
Guidelines
We recommend a 2:1 aspect ratio (landscape) for expanded push notifications.
Images will always span the full width of the notification, and the height will adjust accordingly.
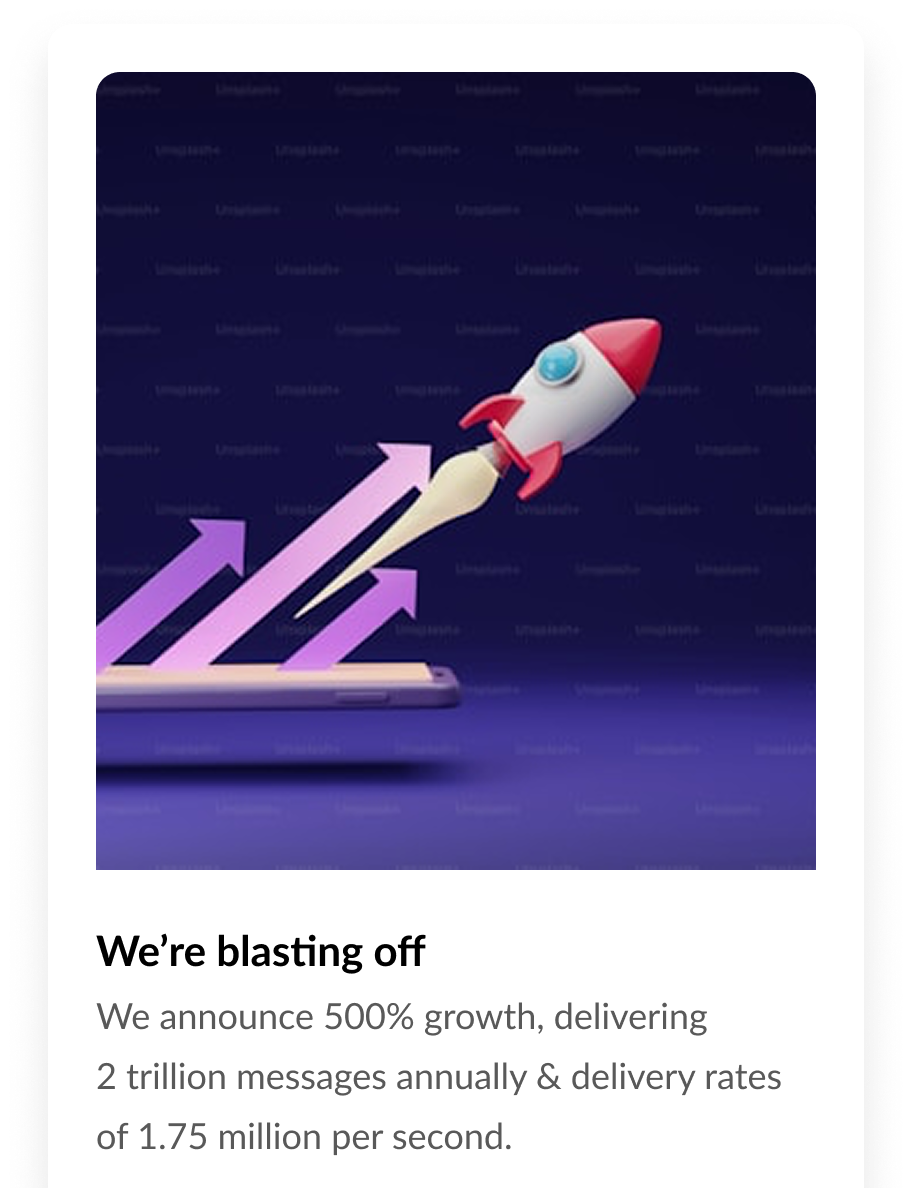
In App Message
In-app push messaging allows marketers to queue up toaster-style messages within their app that will display when users open the app. Opt-in/consent is not required, so deliverability is near 100% of app install base. This message type is great for highly contextual, low urgency messages.
In-app messages are displayed within mobile app without requiring any additional permissions.
The SDK uses a polling mechanism to fetch in-app messages. Once a message is received, the SDK evaluates the app state to determine if it should display the in-app message. If conditions are met, an in-app message dialog will be shown.
To monitor in-app messages, the SDK provides an in-app message lifecycle callback that can be configured from the application
Start and Stop In App Messages
In App message is enabled by default, but if the app needs to stop in app message the app can call:
ZetaClient.shared.inApp?.stop()To restart In App message again, the app can call:
ZetaClient.shared.inApp?.start()Note: The SDK does not persist the stop state; the application must manage this state. By default, the SDK will start displaying in-app messages on app launch.
In App Message Delegate
The SDK provides In App Message delegate which informs about the lifecycle of In App Message when presented
// Called when In App Message is about to be displayed
func willAppear(message: ZTInAppMessage)
// Called when In App Message is displayed
func didAppear(message: ZTInAppMessage)
// Called when In App Message is clicked by user, deeplink is present when in app message has a deeplink
func onClicked(message: ZTInAppMessage, deeplink: String?)
// Called when In App Message is dismissed by user
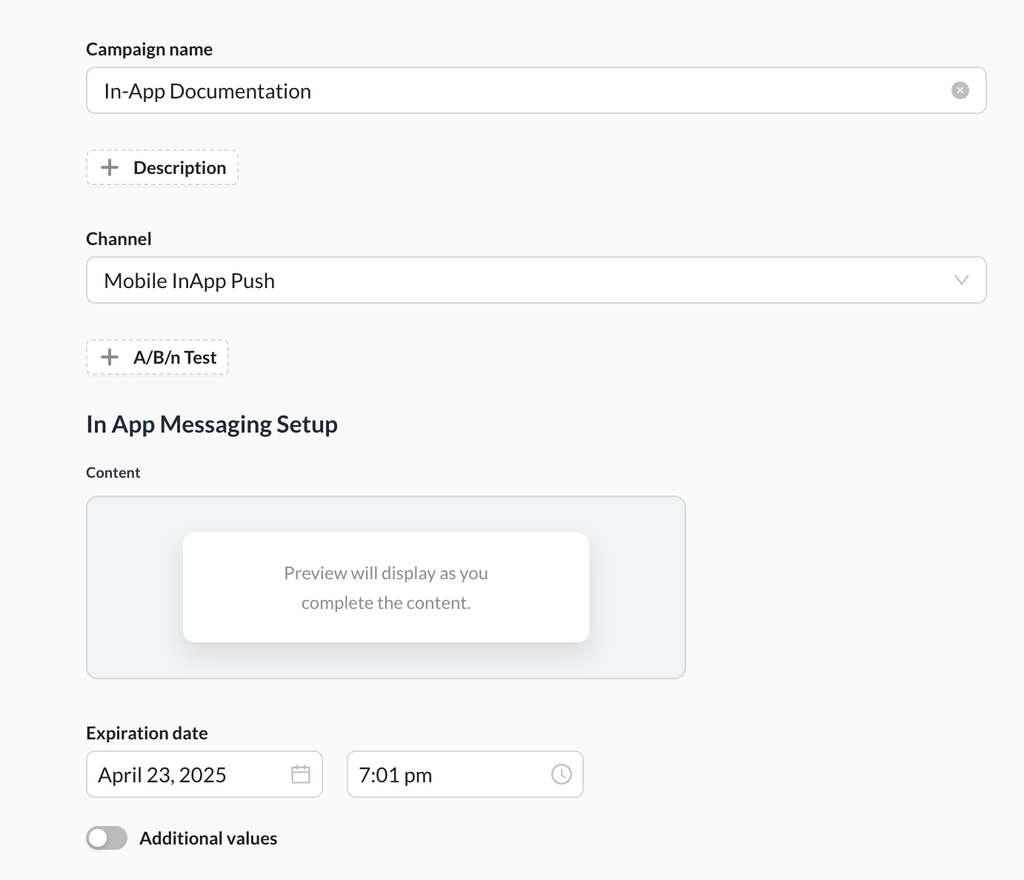
func onDimissed(message: ZTInAppMessage)How to Create an In-App Message
- Access the ZMP Portal
- Log in to the ZMP portal.
- Configure the Campaign
- Navigate to the campaign window.
- Select the channel as 'Mobile InApp Push'.
- Compose the Message
- Click on the In-App Messaging Setup content area to begin composing your message.
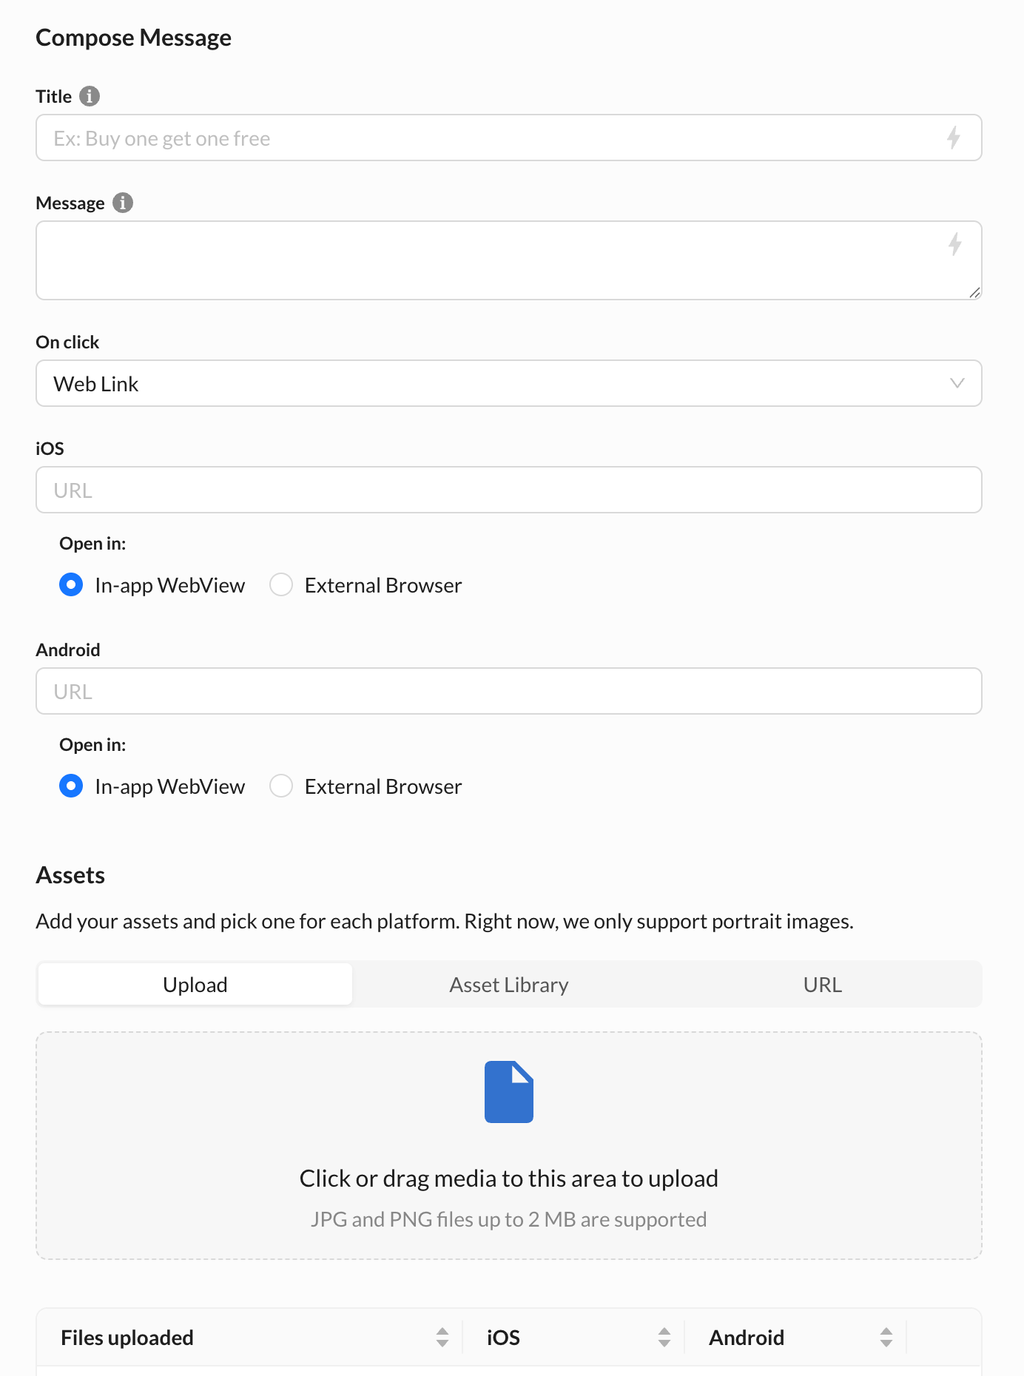
- Message Composition Steps
- Title: Provide a title for your message.
- Body: Provide the body of your message
- OnClick Options: Choose one of the following actions for when a user taps on the message:
- Deep Link: When the user taps on the message, the SDK will deliver the deep link URL to the application through a delegate method. The application must handle internal redirection.
- Dismiss: No action will be performed when the message is clicked.
- Web Link: The specified URL will open in a browser view when tapped.
- In-App Web View: The specified URL will open inside the SDK in SFSafariViewController
- External Browser: The specified URL will open in the device's default browser.
- Email Submission: The email entered by the user in a form template is available in dataModel.inAppMessageFormData?.email.
- In-App Message Image (Optional): An image can be specified through available options.
- Finalize Your Message
- After composing your message, click on the Done button.
- Activate the Campaign
- Activate your campaign from the portal to start displaying in-app messages.
In App Email Collection
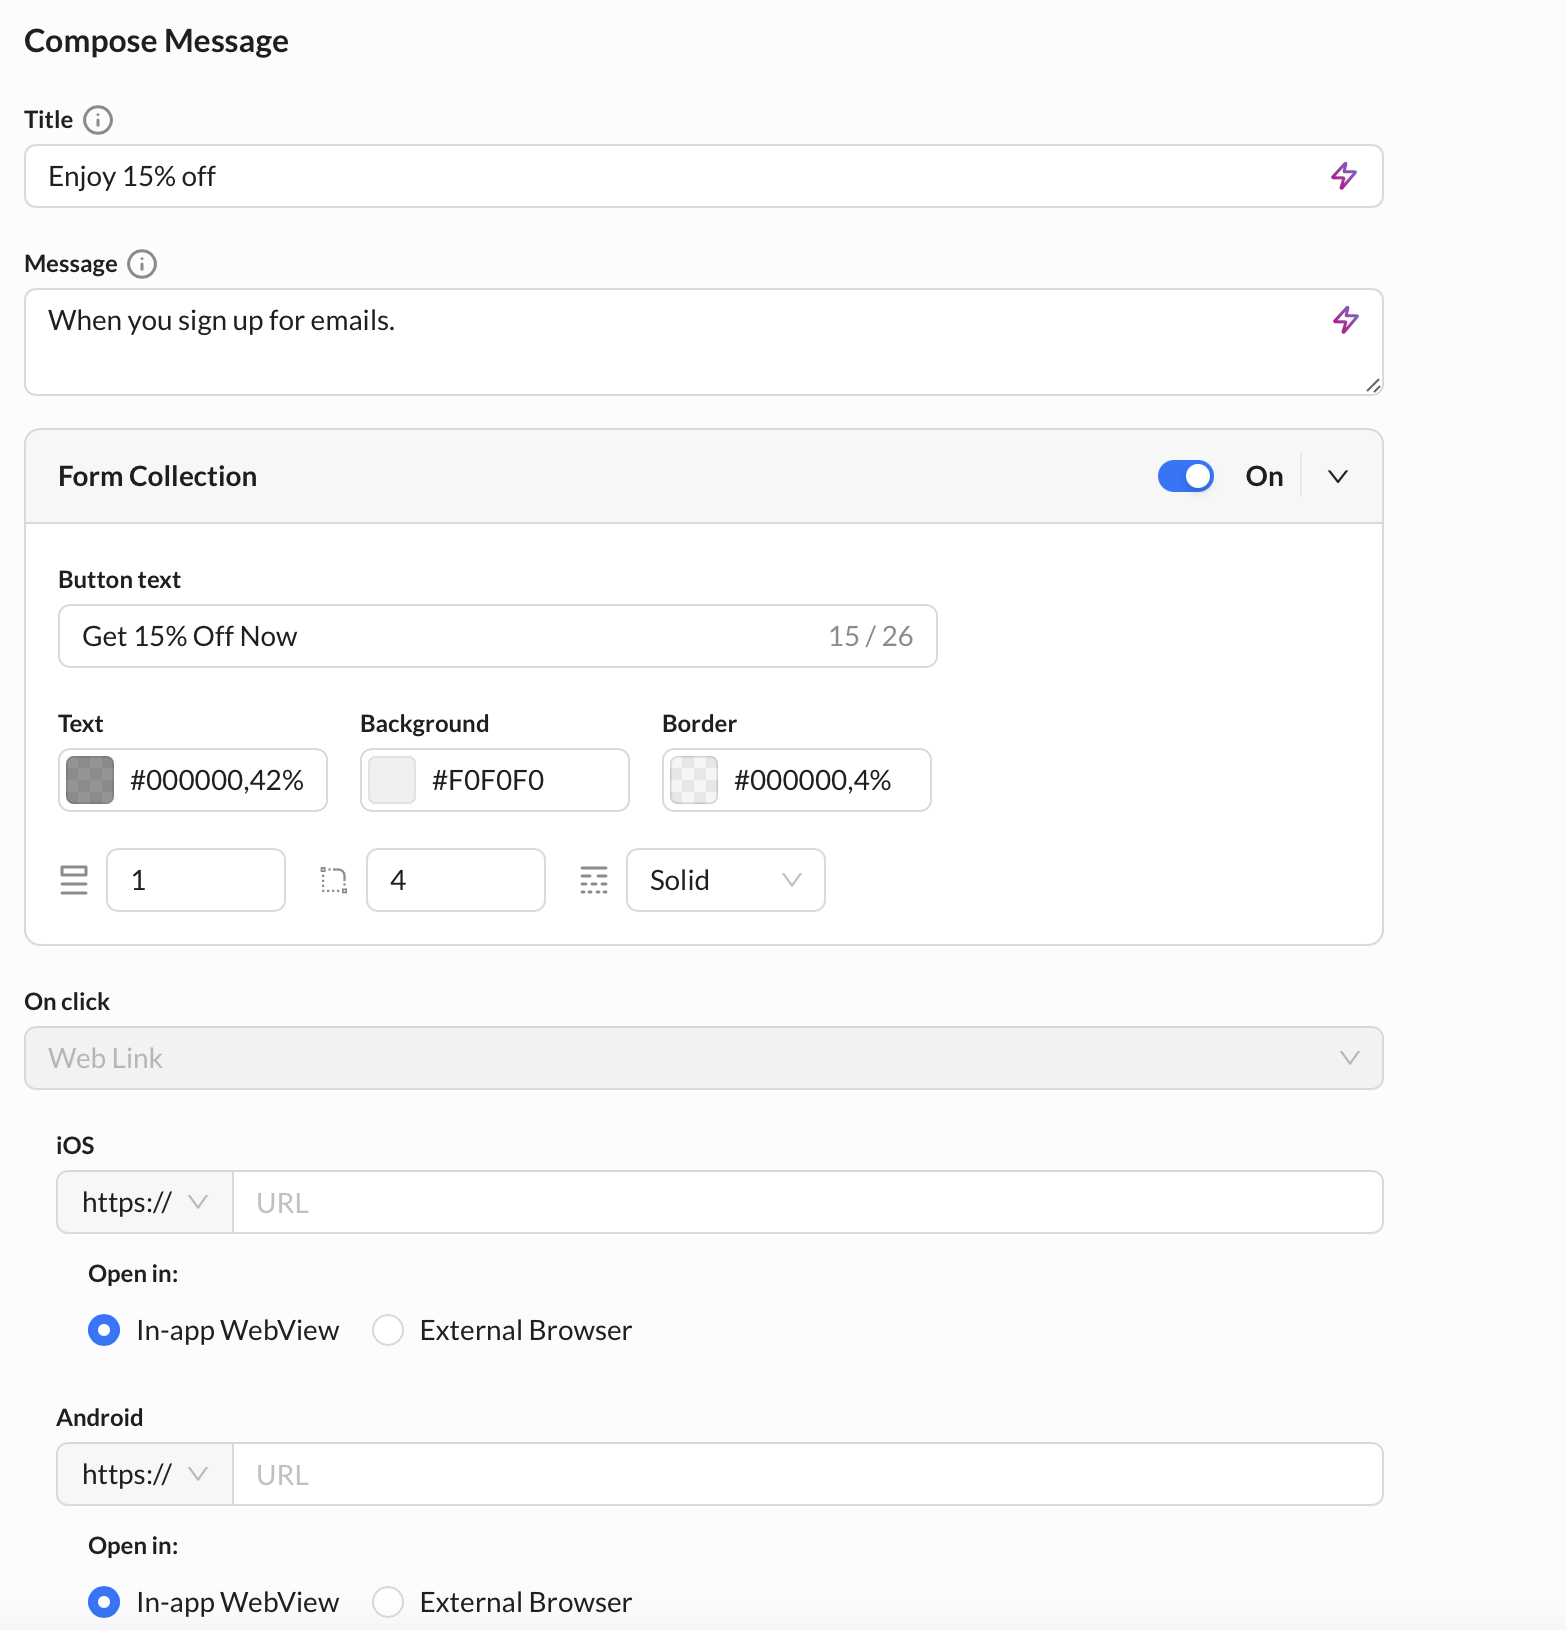
- In-App Email Collection triggers only for unknown users in ZMP (not recognized by the system).
- Known users having email identifier field in ZMP will skip this flow entirely
Privacy & Data Collection
iOS Privacy Nutrition Label: https://knowledgebase.zetaglobal.com/gswz/ios-privacy-nutrition-label
Zeta SDK iOS Data Collection: https://knowledgebase.zetaglobal.com/gswz/zeta-sdk-ios-data-collection
Handle Deeplinks / Universal Links: https://developer.apple.com/documentation/xcode/defining-a-custom-url-scheme-for-your-app
Updated about 1 month ago